QR Codes are now automatically generated for any form created within KPA EHS. These codes can be scanned within the KPA EHS app to quickly complete a form such as a safety observation, workplace incident, etc.
You can export form QR codes to a PDF which can be easily printed on standard Avery Templates. Here’s how:
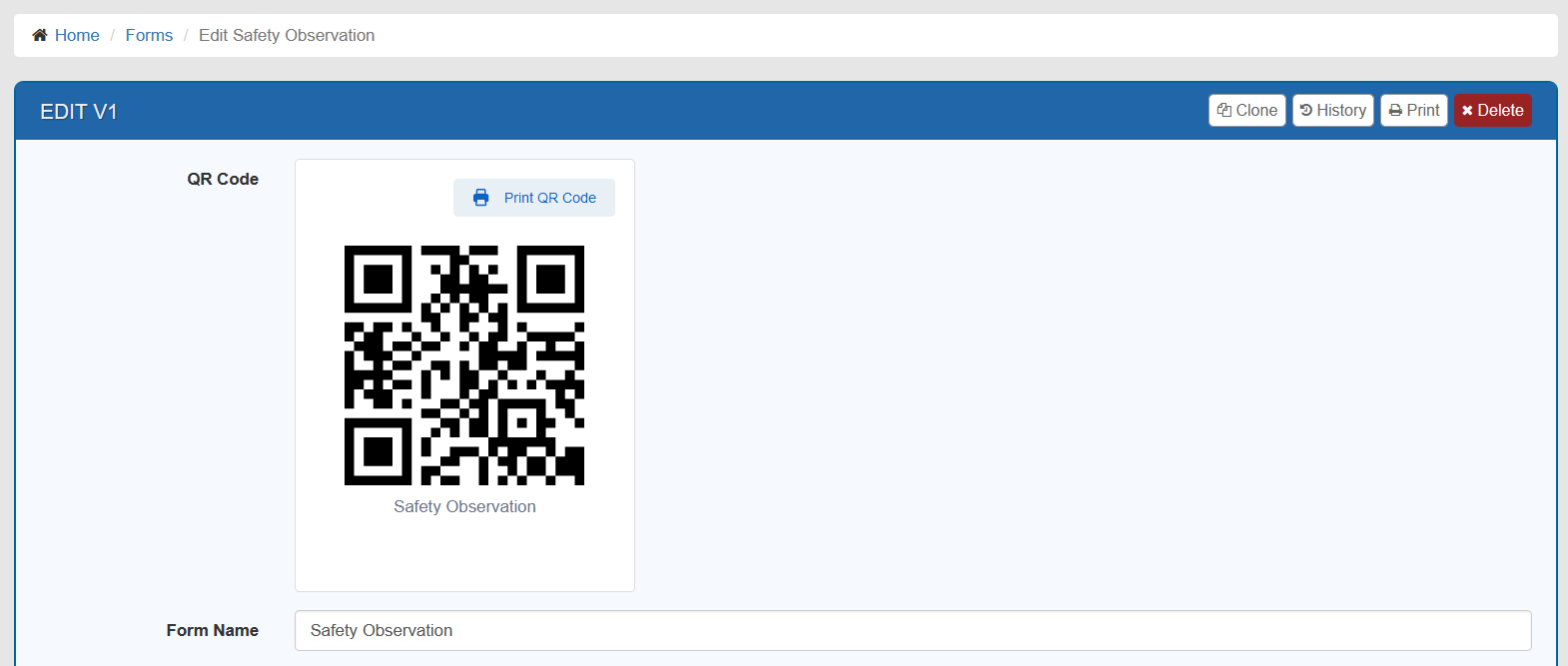
Go to the Forms page and search for the form that you wish to print and click Edit
The QR Code will appear at the top section of the form editor
Click Print QR Code above the QR Code display
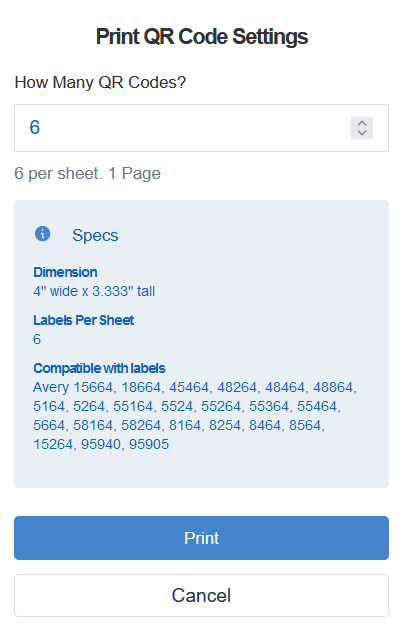
Select the number of QR Codes you would like to print for this form per page
Click Print to download the PDF of the QR Codes and print to label sheets.
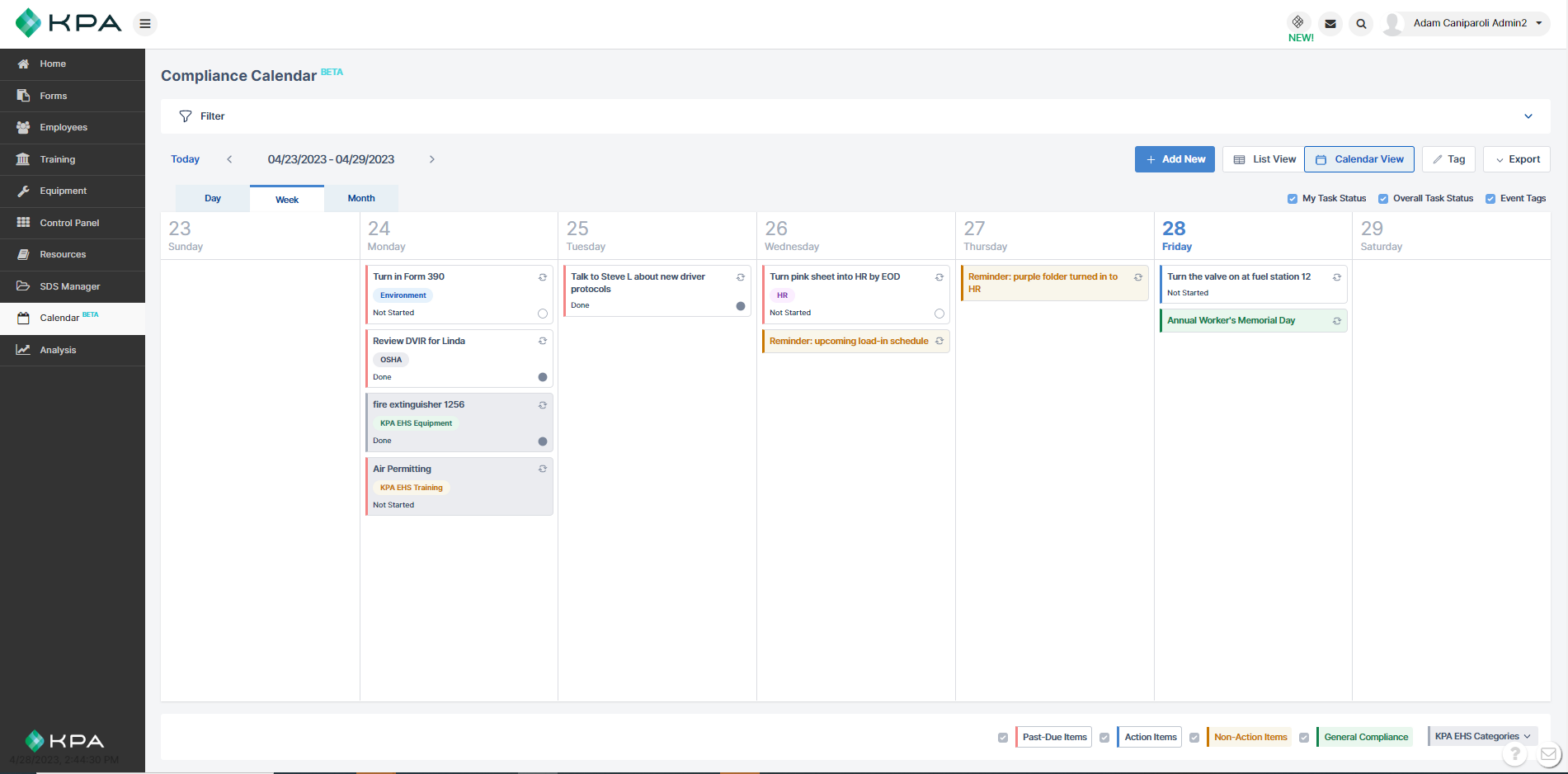
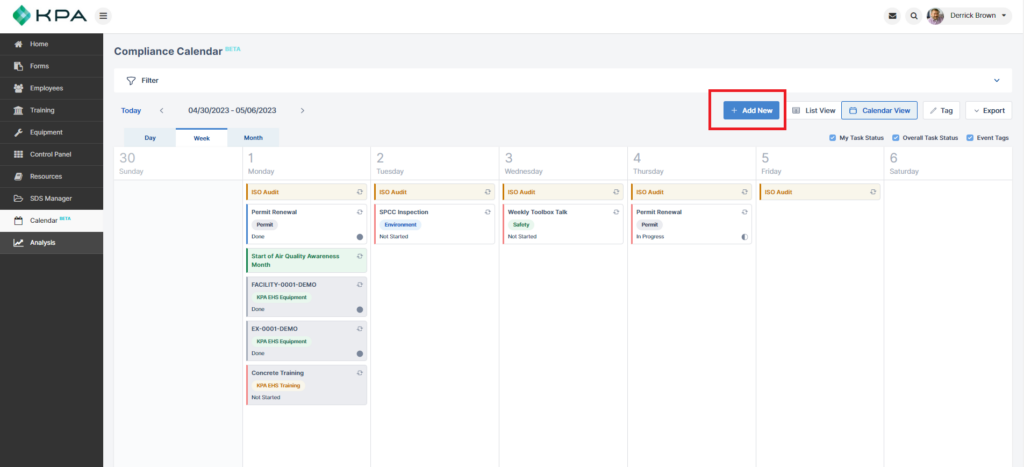
The Compliance Calendar provides users a visual display of an organization’s regulatory deadlines, permits, tasks and much more.
Here’s everything you need to know about adding events to your compliance calendar:
Start from the Compliance Calendar. Select “Add New”
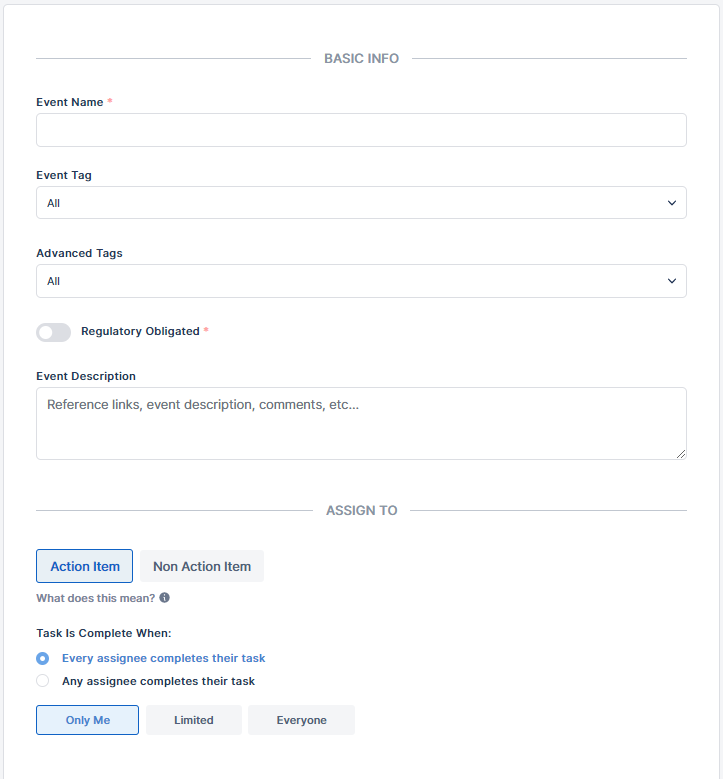
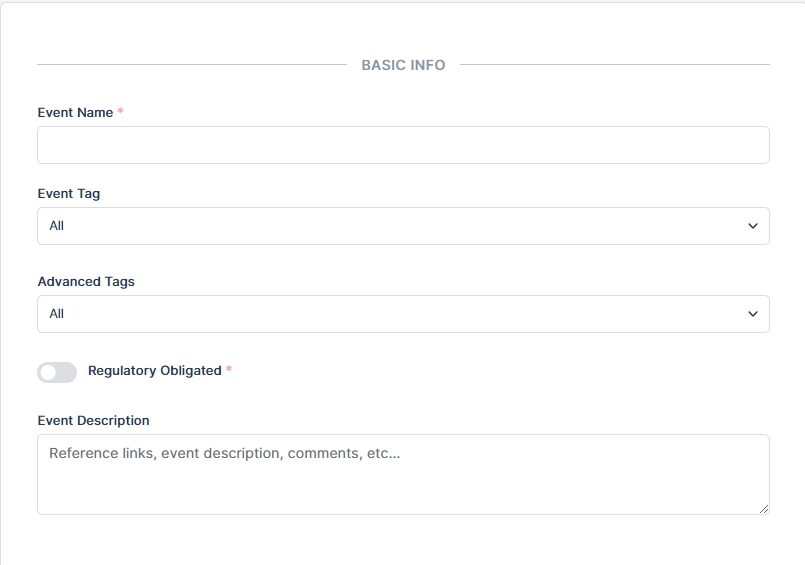
You are then presented with a series of fields to fill out. The only required field is the Event Name. Everything else is optional.
Basic Info
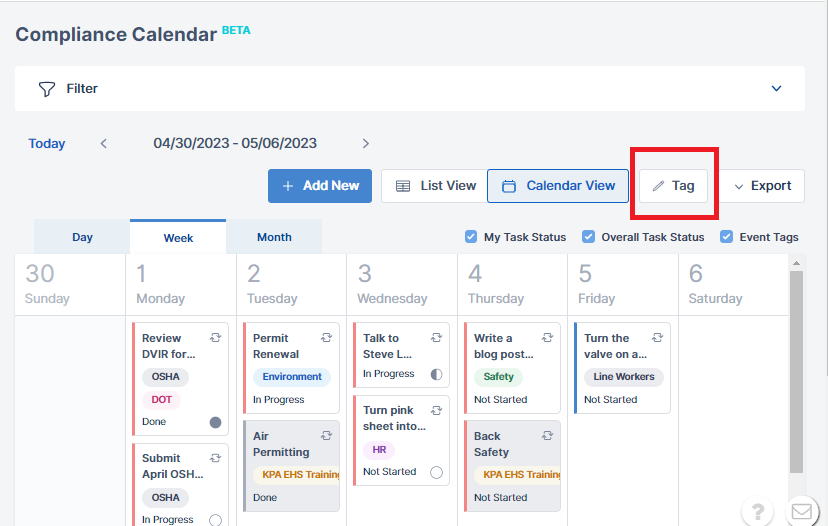
“Event Tags” can be edited from the “Tag” menu on the main Calendar page, which can be found here:
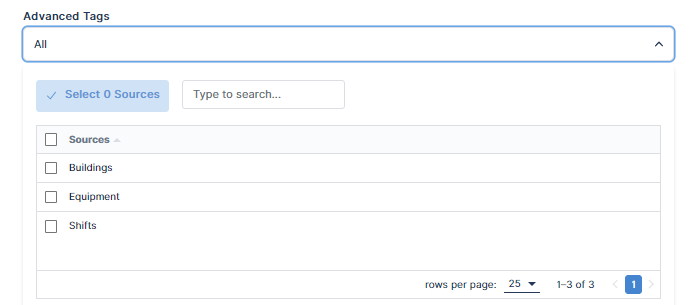
“Advanced Tags” are your Datalist items.
The “Regulatory Obligated” field is a Yes/No field where you can decide whether something is regulatory or not. It doesn’t control anything else throughout site, but this can be filtered later.
Event Description is a brief summary of your event, with any relevant links, comments, or anything you want your employees to be aware of.
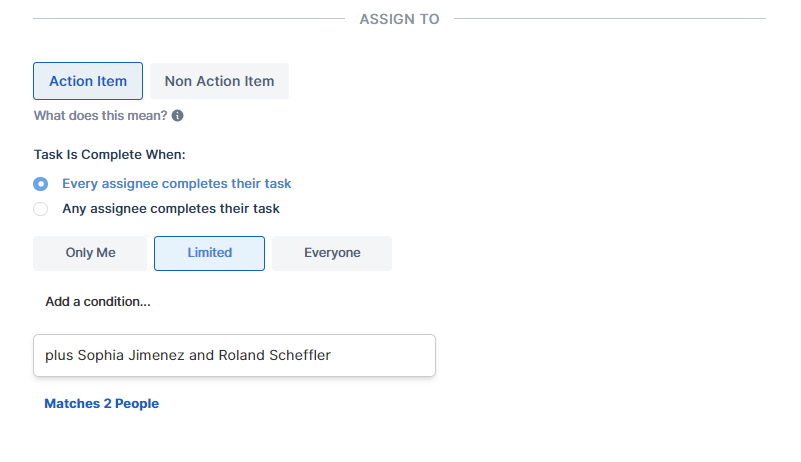
Assign To
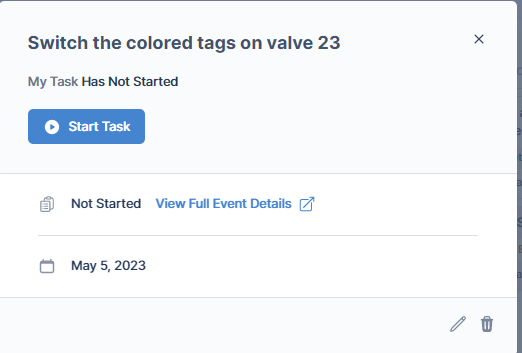
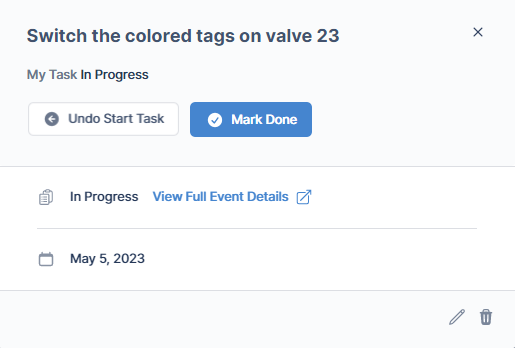
An Action Item is something that will stay incomplete, until someone goes in and says that they completed it. If the task is assigned to you, you can select “Start task”…
then select “Mark done” to mark an action item as Complete.
A non-action item is something that doesn’t ever need to be marked done. It can be used as a reminder to complete a task.
Both action items and non-action items can still be assigned to other individuals or groups of employees via the “Task is Visible To” section.
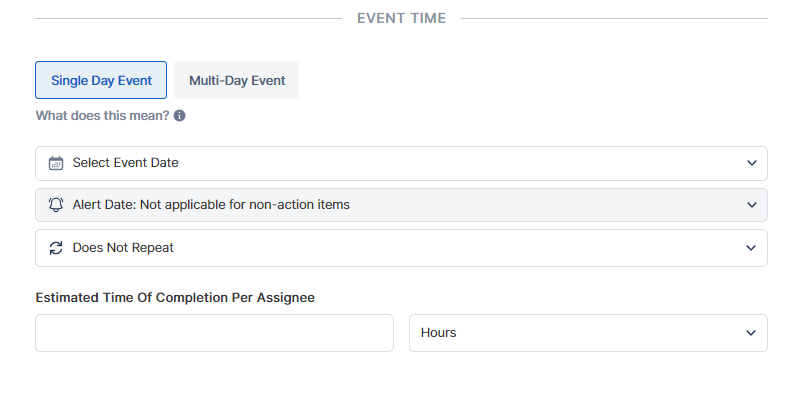
Event Time
You are able to control everything around time from this section. First choose whether the event takes place on a single day or whether it lasts for multiple days, such as a week-long event meant to highlight the importance of conserving natural resources. You can also choose the date of the event, when to be notified, and whether or not the event repeats.
The “Estimated Time of Completion Per Assignee” field is just for record-keeping on the List View; it does not show up anywhere on the Calendar view.
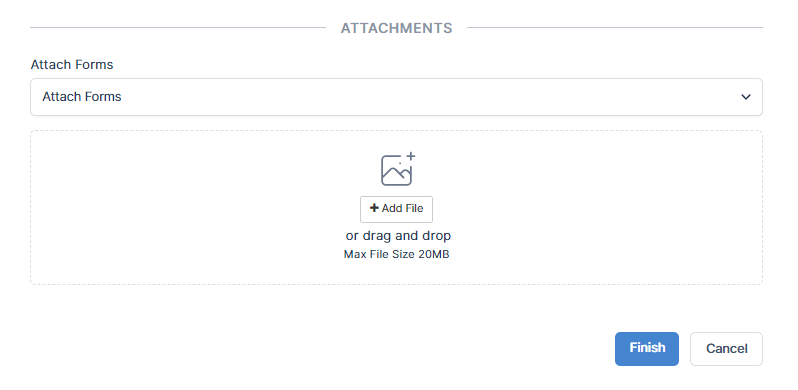
Finally, we have the Attachments section.
You can choose to attach specific forms that are available from your Forms section, or you can attach any file you wish directly from your computer.
To add more Forms to be used on the Calendar, please visit your Forms page.
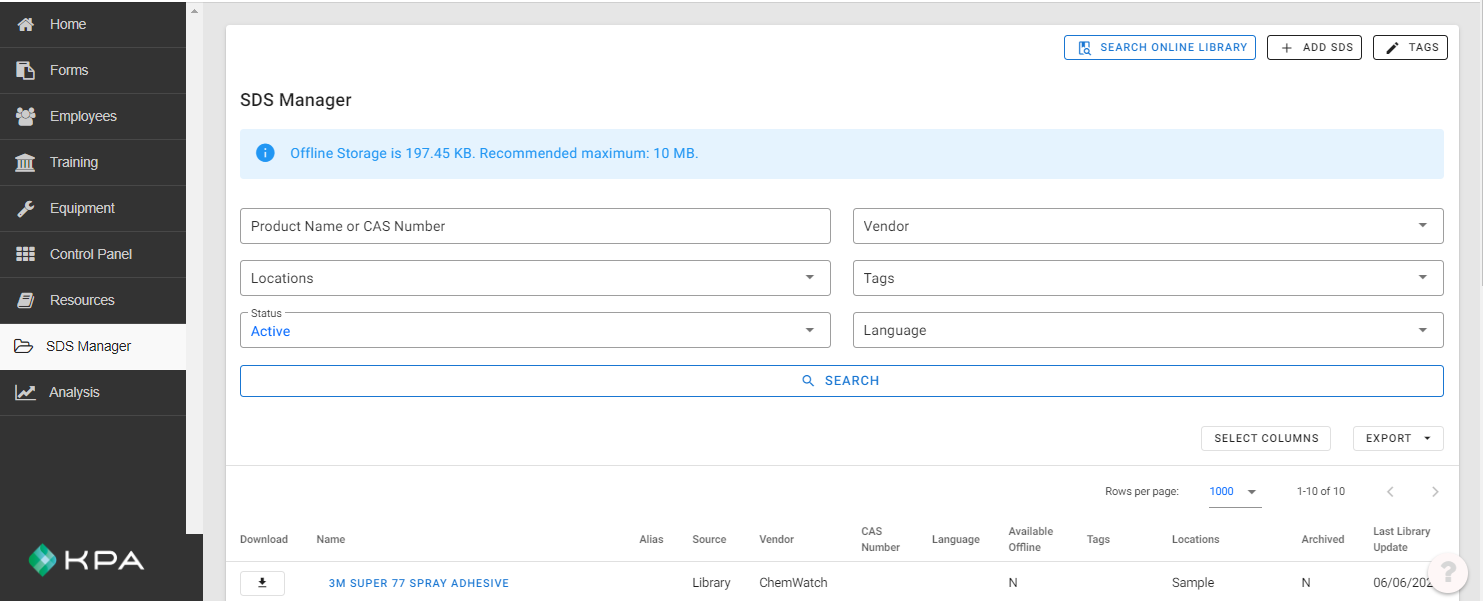
Welcome to the SDS Manager! This is your one-stop shop for collecting and maintaining all of your SDSs. Once you’ve entered your SDSs, you can search for them from here by filtering on Product Name or CAS number, Vendor, Tags, Locations, Status, and Languages.
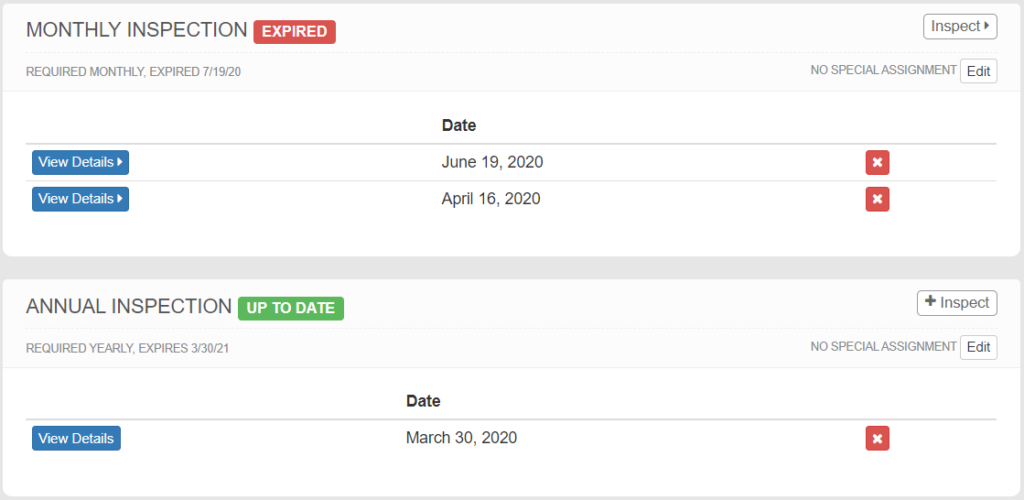
When Equipment gets added to the site, Inspections can be scheduled and assigned to Employees. When creating or editing an Equipment profile, you can assign responsibility of that piece of equipment to one or more employees. When an inspection is due, the employee(s) assigned the equipment will be notified with an Open Task to complete the inspection. When assigned to multiple employees, a completed inspection by any member of the group will update the Status of the equipment and remove the Open Task for the other employees.
ASSIGNING EQUIPMENT
To assign a piece of Equipment to an employee, or change the assignment:
Open the profile page for the Equipment you wish to edit
Click Edit
Select employee(s) from the drop-down list in Assign To
Click Save to complete changes
You can also create and edit Equipment Assignments via the Dataload. This is especially useful if you’re working with a large number of items or have many changes to make.
Equipment inspections will default to the Employee(s) assigned to the equipment. In many cases this might be sufficient, however, if you have an employee that is responsible for keeping track of the equipment, but is not able to complete an inspection, you can create a Special Assignment for another employee to be responsible for the inspection.
To assign another employee to complete an inspection:
Open the profile page for the Equipment you wish to edit
In each Inspection for the Equipment, click Edit next to NO SPECIAL ASSIGNMENT
Select the Employee(s) to be assigned
Click Continue to complete changes
COMPLETING EQUIPMENT INSPECTIONS
Open the profile page for the Equipment you wish to inspect, OR
Click the Open Task for an Inspection that is assigned to you
Click Inspect
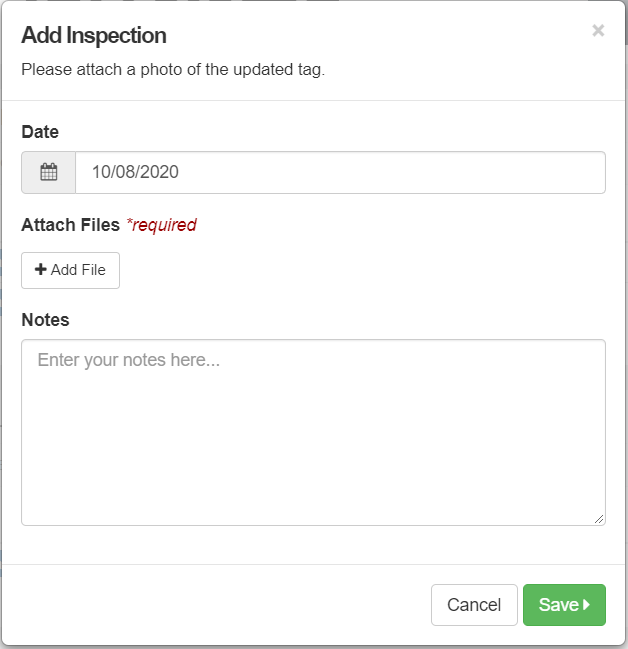
Enter the inspection date, notes, and attachments
Press Save to complete the Inspection
If the Inspection is set up as a Form:
When you click Add Inspection or the Open Task, the Form will appear
Complete the requirements of the Form
Click Submit
UPDATING INSPECTIONS VIA DATALOAD (SPREADSHEET)
You can also create and update Equipment Inspections via the Dataload. This is especially useful if you’re working with a large number of items and have historic information to upload.
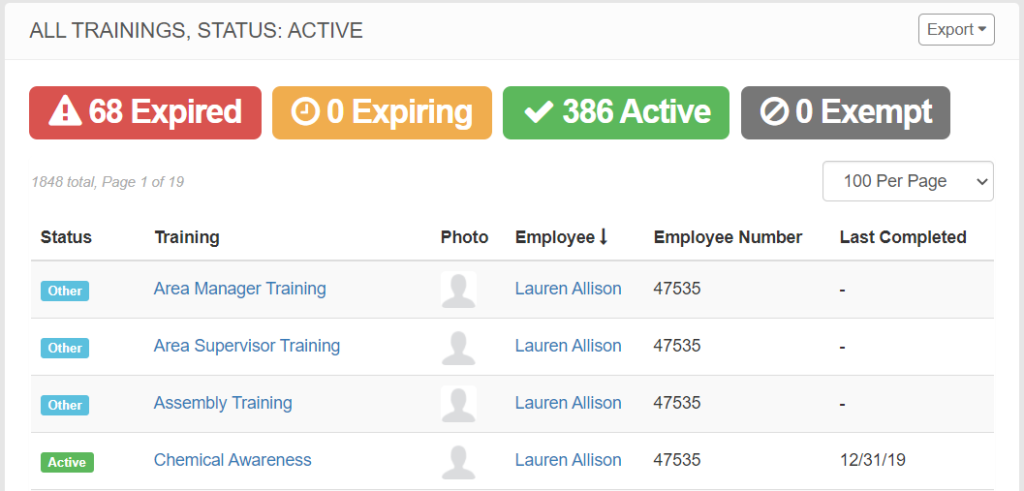
The Training Status Report allows you to see a real time update of training completions and employees’ status. This data can also be automatically sent out by setting up a Scheduled Report.
NOTE: To view the Training Status Report, you must have the Training Status permission.
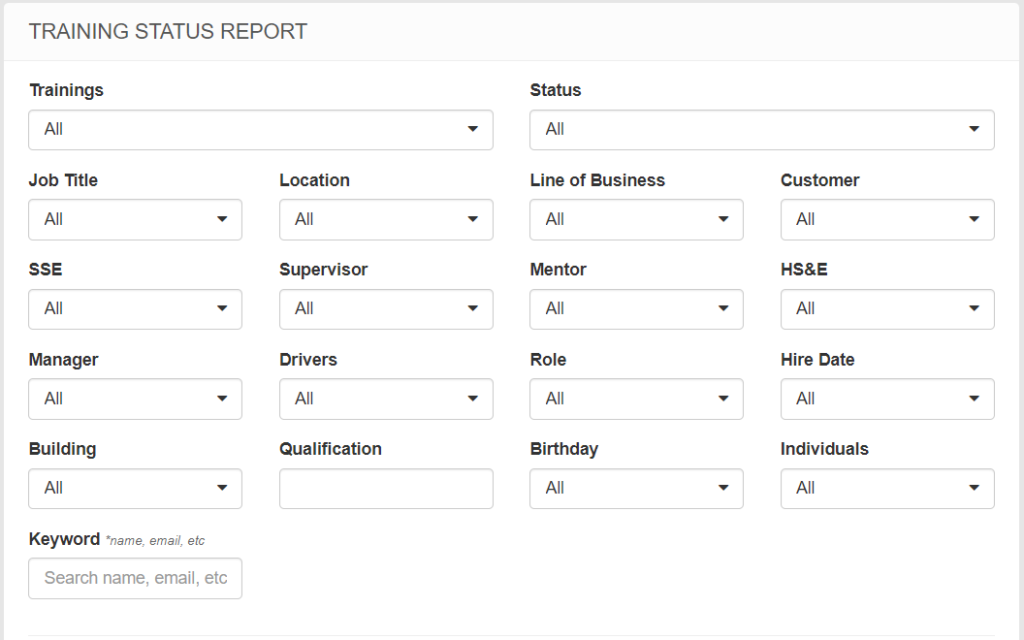
VIEWING THE TRAINING STATUS REPORT
Navigate to Training > Training Status Report
This page allows you to choose what data you would like to view and how you would like to view it.
You can filter by Training Topic, Status, and by data from the Employee Profile, including any custom fields. The default is to view all Trainings.
Once you have your filters set for the data you wish to view, click Search.
This page allows you to view the same data in different ways by choosing between Trainings, Employees, Employees Per Training, and Completions.
For more info about these, you can click the i icon next to each tab for a brief description.
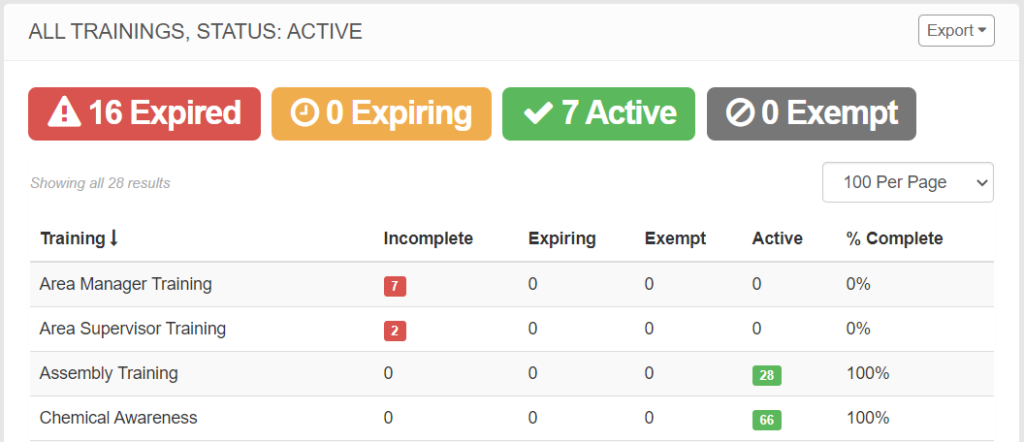
The Trainings view below shows the results of all 32 Training topics, the number of employees who are Incomplete or Expired, Expiring, Active (up to date) and Exempt. You can Sort the data, choose which Columns of data to view, and Export the data to a PDF or Excel spreadsheet.
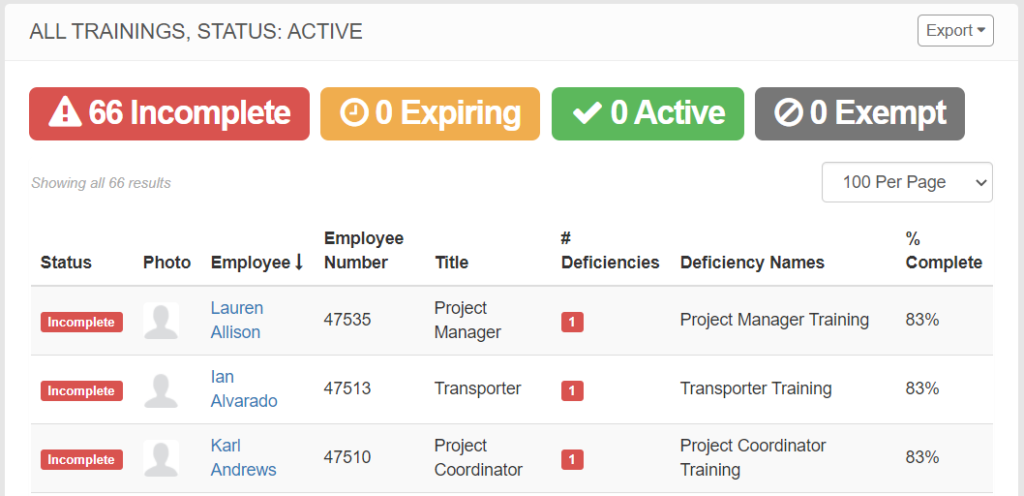
The Employees view below shows the results of all 66 employees by name and an overview of Status. This view allows you to see the Completion %, # of Deficiencies and deficient Trainings for each employee. You can Sort the data, choose which Columns of data to view, and Export the data to a PDF or Excel spreadsheet.
The Employees Per Training view allows you to see the Status of each Training for each Employee. This view produces a lot of results because there is 1 row, per training, per employee. You can Sort the data, choose which Columns of data to view, and Export the data to a PDF or Excel spreadsheet.
The Completions view allows you to see the completion dates for each Training, by Employee. It also opens a new search filter to select the date range you want to view. The site defaults to the previous 7 Days, but you can choose the range.
Once the Date range is selected, this view allows you to see the most recent Completion dates for Employees by Training topic. You can Sort the data, choose which Columns of data to view, and Export the data to a PDF or Excel spreadsheet.
EXPORTING THE TRAINING STATUS REPORT
The Training Status Report has a variety of options to Export. As you’ve seen so far, each individual tab has Export options, but you can also Export the data into a Training Matrix style report or an ISNetWorld friendly report.
Once you have filtered the data you want to Export, click the white arrow next to the Search button to choose the report style.
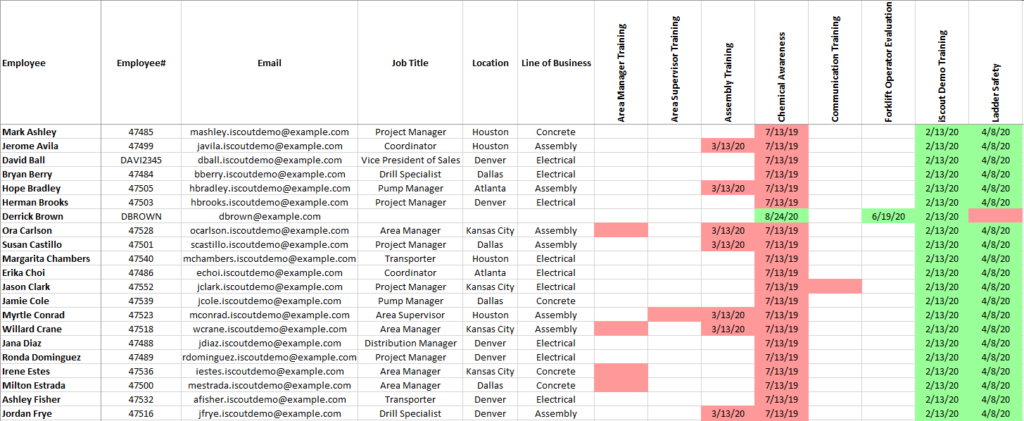
The Matrix view looks like this, with all selected Training topics along the top row, and all selected Employees along the left column.
A blank field means that the Employee has never completed that Training
A field highlighted in Red indicates the Training is required and has either never been completed, or has Expired
A field highlighted in Green indicates the Training is required and is Active (up to date)
A field highlighted in Yellow indicates the Training is required and is Expiring
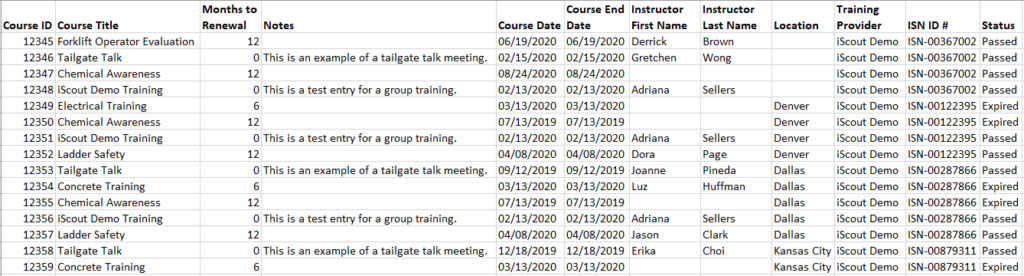
The ISN-EXPORT view looks like this, and provides an ISNetWorld friendly report with the Course ID, Title, Employee ISN ID#, etc. The Course ID needs to be added to the Training Topic to populate on this export, click here for more info. The Employee ISN ID# would also need to be in the Employee Profiles, click here for more info.
This data can also be automatically sent out by setting up a Scheduled Report
The KPA EHS API allows you to programmatically access your company’s data. The link above will walk you through the process of creating an API token, making a request, handling the response, and exploring the available methods.
You can manage your Equipment and Inspection records through KPA EHS. This guide will use Trucks as an example, but there are endless possibilities once you understand the tools.
EQUIPMENT TYPES
Before you start adding each of your Trucks to iScout, you need to define a Truck. To do this, you will create a type of equipment called Truck and setup inspection schedules, additional fields, etc. A Standard Equipment Profile keeps track of information like Serial #, Location, Line of Business, Employee Assigned To, etc. Adding Custom Fields allows you to keep track of data for equipment that is not included in the default list, like VIN, Year/Make/Model of a vehicle, Registration Info, etc.
Navigate to Equipment > Manage Types > +Add Type
Enter Trucks as the title for this equipment
Click +Add to create Custom Fields (optional)
Provide a Field Name, then choose the Field Type
Text, where you type in any text
Numeric, where you type in a number
List, pulls from a Datalist already in the site
Date, like a registration date
If List is selected, choose from the options provided
For more information about creating and utilizing Datalists, click here
You can create as many different Custom Fields as you like
Inspections allow you to schedule tasks for each Equipment type and create a set schedule for when those inspections are due
Click +Add to create Inspections (optional)
Provide a Name for the Inspection, then choose the Schedule type
None, inspections are not required, status will always be up to date
Time, inspections are required weekly/monthly/annually/etc.
Custom Field, inspections are required based on a custom field, e.g. 5000 miles or 200 hours, etc.
If Time is selected, choose the Frequency (how often the inspection is required), the Timing (when during the month) and Begins Expiring (when to begin notifications)
Click the icon for more information about these options
If Custom Field is selected, choose the Field and the Frequency desired
The site will allow you to utilize a Form as part of your Inspection by selecting from the list. Click here for more info about creating and using a custom Form for your Inspections.
Attachments? allows you to require attachments like photos or files for the inspection, or make them optional
Click Done to save your changes to the Inspection
You can create as many different Inspections as you like
Click Save to create your New Equipment Type
ADDING EQUIPMENT
Now that you’ve defined a Truck, let’s add an actual truck to the site
Navigate to Equipment > +Add Equipment
Complete the form:
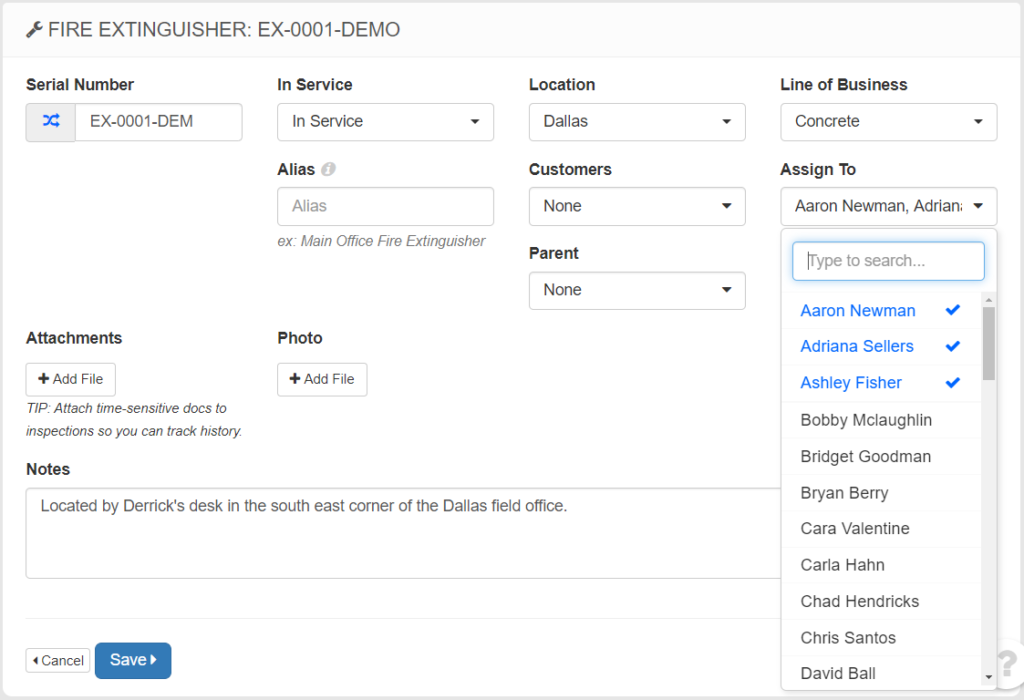
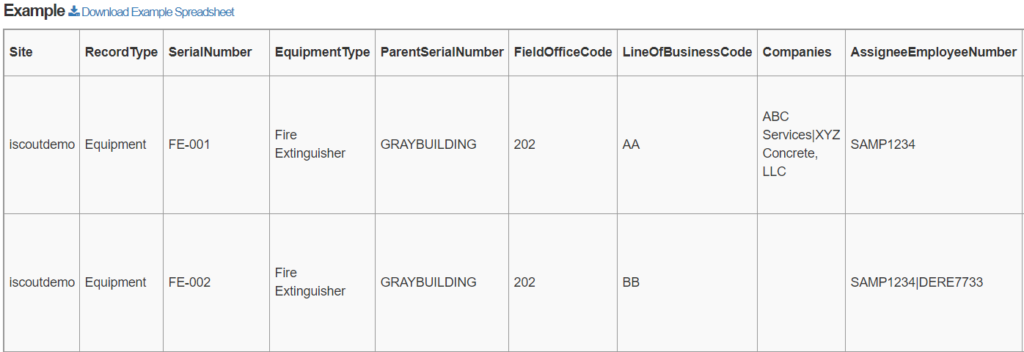
Serial Number – This is an identifier that iScout will use to reference the piece of equipment. It must be unique across the entire system. In other words, you can’t have a Truck “123” and a Fire Extinguisher “123”. In that case, you should use a prefix like “truck-123” and “fe-123”.
Type – Choose the equipment type
Location – (Optional) The office or location of the item
Line of Business – (Optional) The line of business of the item
Alias – (Optional) Employee friendly name unique to this item
Companies – (Optional) Customers or subcontractors associated with the item
Assign To – (Optional) The employee who is responsible for the equipment. This person will receive the open tasks when an inspection is due.
Parent – (Optional) Another piece of equipment that this is associated with. E.g. a Fire Extinguisher that is assigned to a Truck.
Attachments – (Optional) You can attach documents like receipts or purchase orders here. Any time-sensitive documents like inspections should be attached within an inspection.
Photo – (Optional) You can include a profile picture for this item if you’d like.
Notes – (Optional) Include whatever text you’d like to describe the item, etc.
Press Create
Once you’ve created the truck, you can now edit the custom fields
Click Edit
Make any changes needed like adding a photo, updating the Year, Make & Model or Registration Date
Click Save to keep the changes
Now that your truck is in the system, you may notice that the inspections are out-of-date (because you haven’t added any yet). This means the assigned person receives open tasks for these inspections as well. For info on completing Equipment Inspections, click here.
ADDING EQUIPMENT VIA DATALOAD (SPREADSHEET)
You can also create equipment via the Dataload. This is especially useful if you’re working with a large number of items. For more information, click here.
Note you can also update custom fields using the dataload. For example, you could run a weekly update of mileage for all on your trucks.
COMPLETING AN INSPECTION
Now that you’ve listed your equipment in the system, we’ll walk through the 2 ways to complete an inspection.:
Open the profile page for the Equipment you wish to inspect, OR
Click the Open Task for an Inspection that is assigned to you
Click Add Inspection
Enter the inspection date, notes, and attachments
Press Save
A few things worth noting:
When you setup your equipment type, you can choose a “Form” for the inspection. This is a form that you designed (within the Forms module) and the inspector is required to fill it out for the inspection. Click here to learn more about using custom Forms for Inspections.
The inspection will expire based on the date you select. So, if you want the inspection to expire on a specific date, set your start Date accordingly.
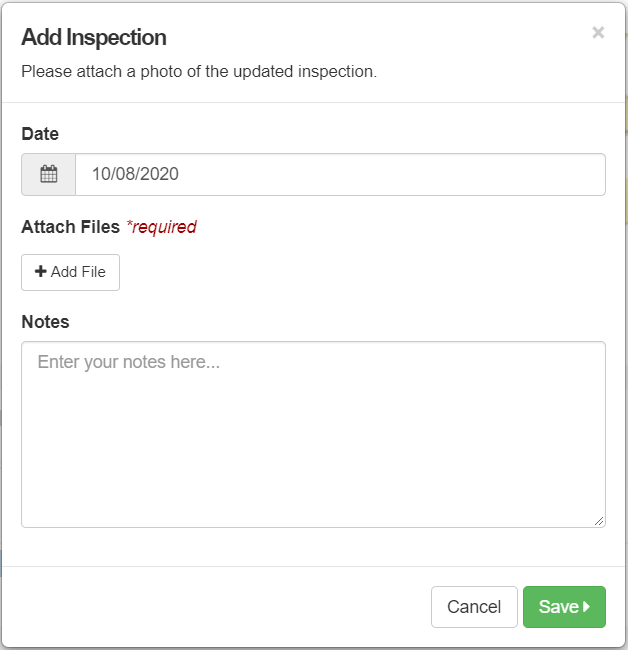
If the Inspection is set up as a Form:
When you click Add Inspection or the Open Task, the Form will appear
Complete the requirements of the Form
Click Submit
UPDATING INSPECTIONS VIA DATALOAD (SPREADSHEET)
You can also create and update Equipment Inspections via the Dataload. This is especially useful if you’re working with a large number of items and have historic information to upload. For more information, click here.
This guide walks through the process of using a custom-designed Form for equipment inspections. This is a continuation of the Setting Up Equipment and Inspections guide.
INSPECTIONS WITHOUT A CUSTOM FORM
Say you are using iScout to track fire extinguisher inspections every year. By default, the inspection process is just choosing a date, adding notes, and attaching documents (optional).
CREATING YOUR FORM
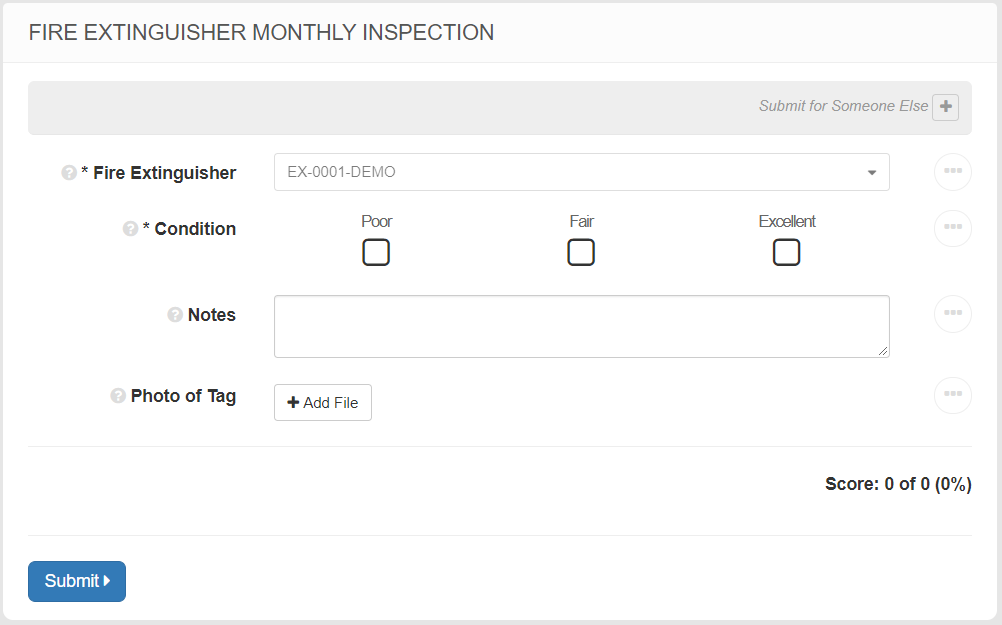
Let’s say that you would like more detailed information for this inspection. For example, having a rating for the condition of the extinguisher and a measurement of its pressure gauge. To do this, you will create a form within the Forms module.
Your Form can include any questions you like, but there is one requirement. You must have a required Select field where the source is set to Equipment. Here’s how we’ll make it:
Navigate to Forms > +New Form
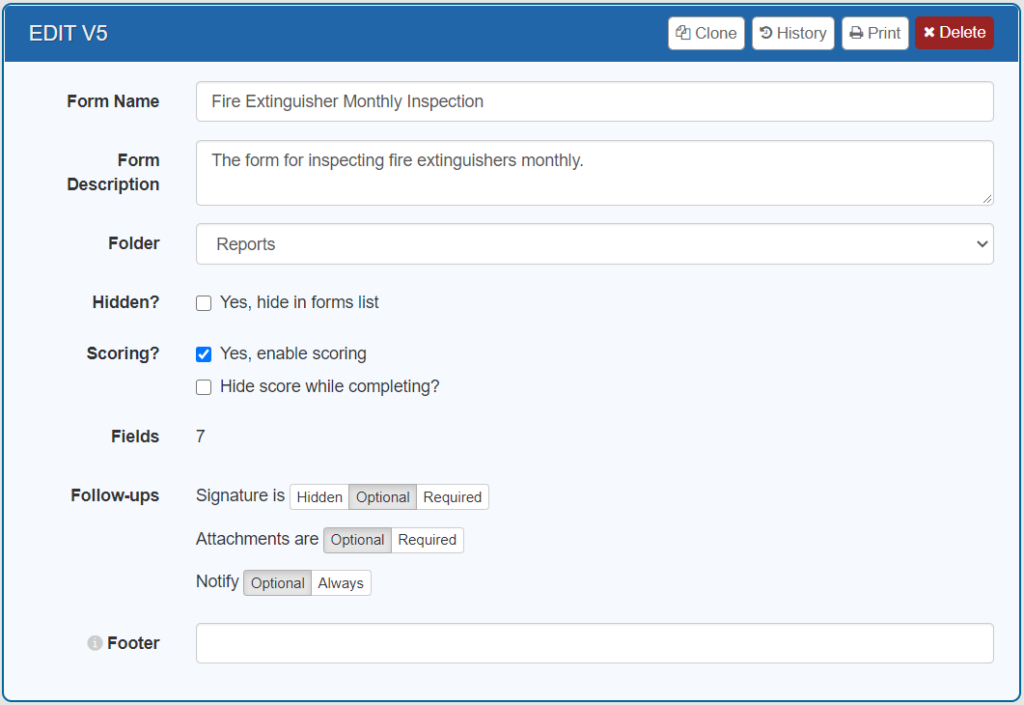
Enter “Fire Extinguisher Inspection Report” for the name
Enter “This is the form used for fire extinguisher inspections every month.” for the description
Check the Hidden? box. We only want this form to be accessible when filling out an inspection for a fire extinguisher.
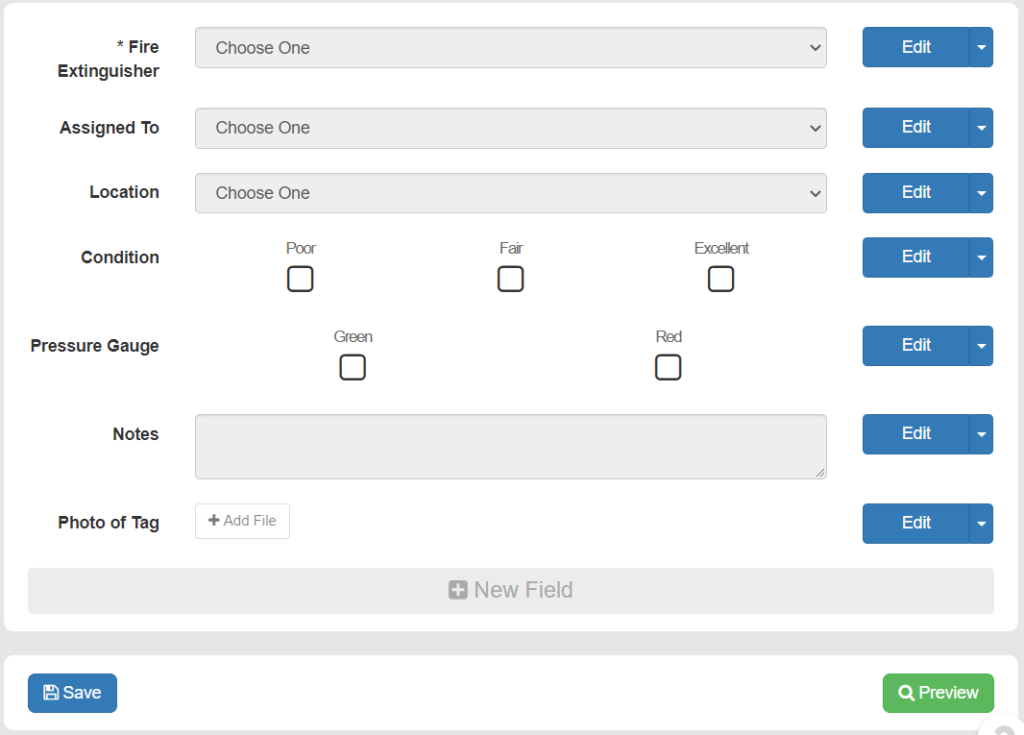
Now add the required equipment field. As mentioned, this is the only field that you are required to have on an inspection form.
Press New Field > Select
Enter “Fire Extinguisher” for the title (it could be anything)
Check the Mandatory box
Click Settings and choose the Equipment source
Press Done
Now create a few quality rating checklists
We’ll call them “Condition” and “Pressure Gauge”
We’ll also add optional Notes and Attachments fields
Press “Save” to create your new form
For more information about building custom Forms, click here
ATTACHING YOUR NEW FORM TO THE INSPECTION
Now that you have created the “Fire Extinguisher Inspection Report”, we’ll setup the extinguishers in our system to use this for the inspection form.
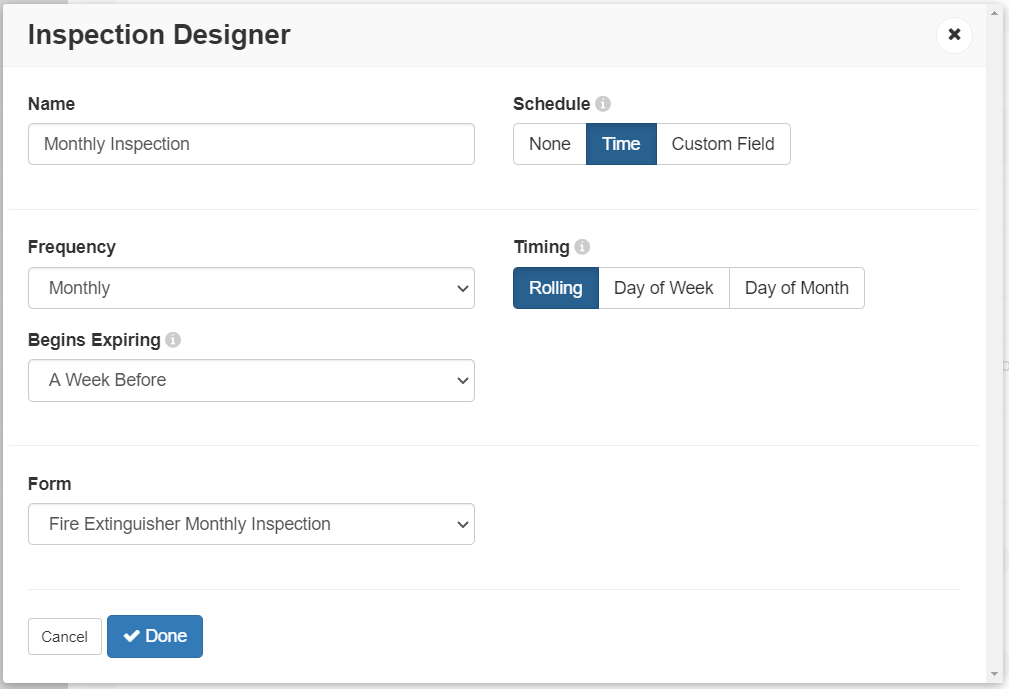
Navigate to Equipment > Manage Types > Edit next to Fire Extinguisher
Click +Add in the Inspections
Name the Inspection and set the Schedule
Choose the Fire Extinguisher Monthly Inspection for the Form
Press Done then Save
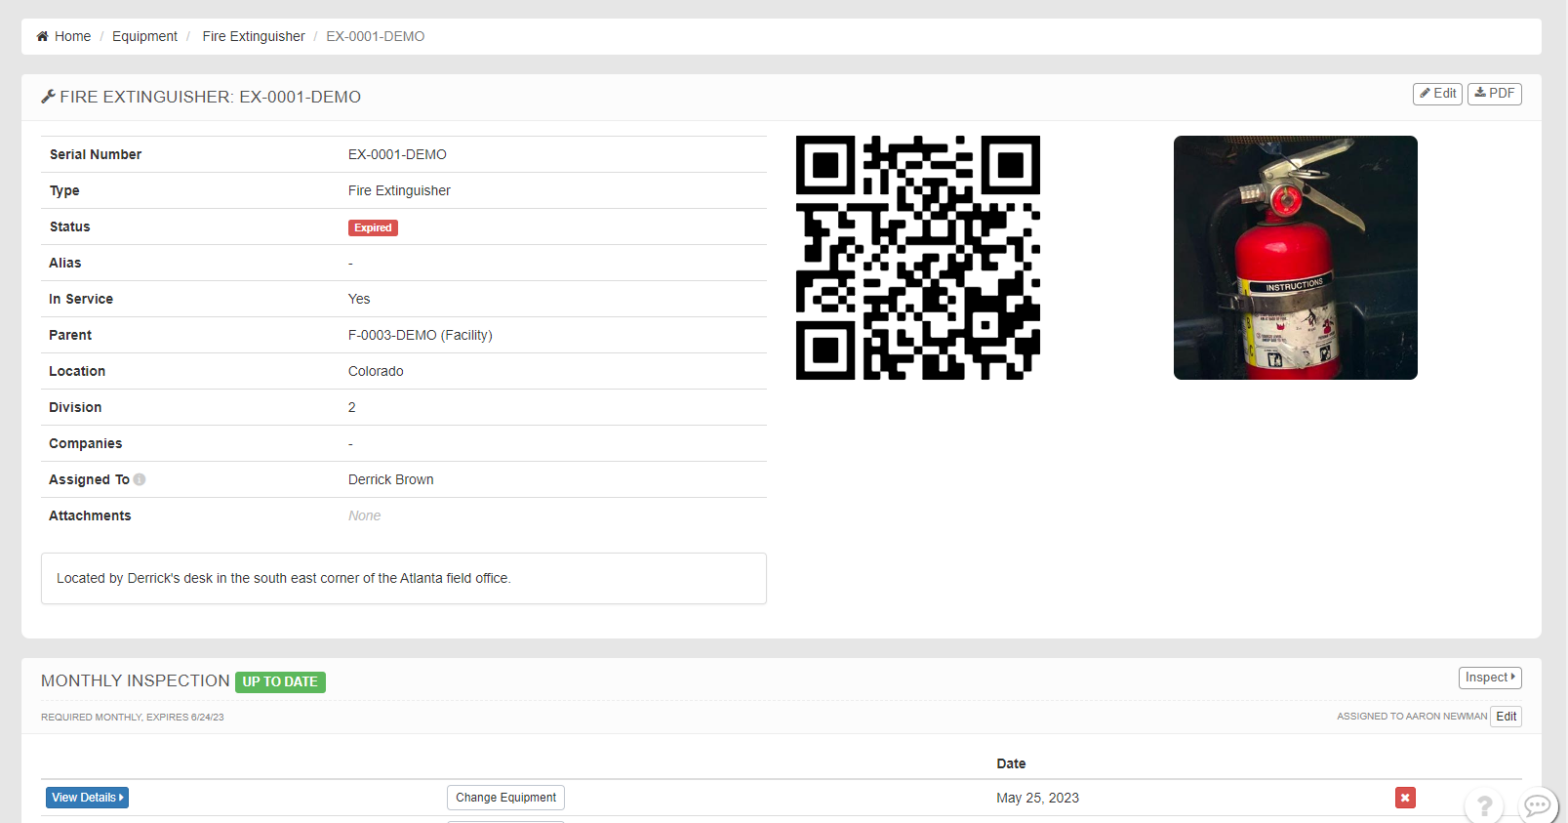
Now when you view one of your extinguishers, you’ll see an “Inspect” button. Click it and the site will show your form and the “Fire Extinguisher” field will be pre-filled. Once you complete the form, the inspection will be attached to your equipment.
ANALYZING INSPECTIONS
It’s worth noting that when you use a custom form for an inspection, you get all of the standard analysis tools and even alerts for free. For example, you could review inspections from a high level by clicking Reports > Responses (next to Fire Extinguisher Monthly Inspection).
For more information about viewing and analyzing Form responses, click here.