Administering OSHA Case Management

OSHA CASE MANAGEMENT

The OSHA Case Management module is used to track recordable work-related injuries and illnesses, generate OSHA forms 300, 300A, 301, and to analyze stats like TRIR and DART.

To learn more about OSHA recordkeeping, click here.

ADMINISTERING CASE MANAGEMENT

NOTE: To edit and access this module, you must have the OSHA Case Management permission granted to you.

Graphical user interface, application

Description automatically generated

Navigate to Control Panel > OSHA Case Management

Once the module has been enabled and setup, you will have the ability to create, view, and edit all OSHA Recordable Report cases, analyze TRIR and DART metrics and download copies of OSHA 300, 300A and 301 logs.

CREATING & REVIEWING INCIDENT CASES

To begin a new incident report, click + NEW CASE on the Dashboard page to begin filling out the OSHA Recordable Incident form. 

This form will only be available to fill out within the OSHA Case Management module.  The data that is collected in this form is used to calculate TRIR, DART and Severity metrics.

To review previously submitted cases:

  • Choose the year the Case occurred
  • Click VIEW to open the iScout response report
  • Click EDIT to make changes to the iScout response.  Any changes will also update relevant metric data.
  • Click the icon to download the OSHA 301 form for this case
  • The indicates that all questions on the form have been completed
  • Click DELETE to remove the case report from the OSHA Case Management module
Graphical user interface

Description automatically generated

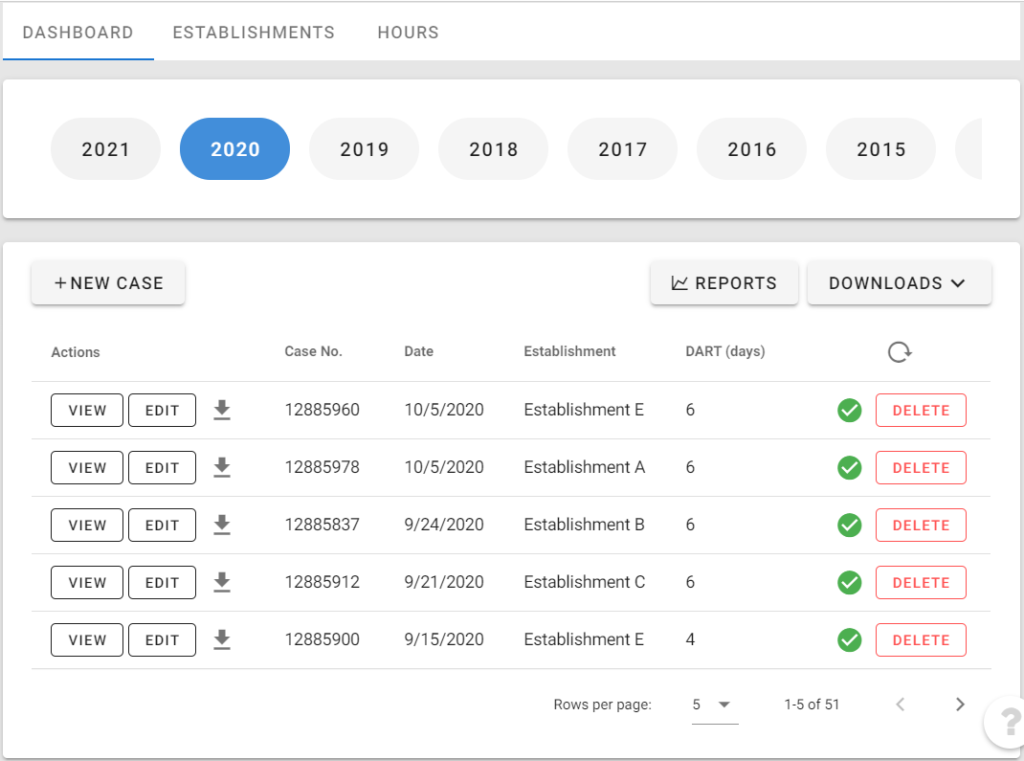
The DOWNLOADS option will give you the ability to download, save and print any, or all the OSHA reports (300, 300A and 301) for the year selected. 

This may require some time for the site to create these reports, depending on the number of Cases and Establishments

To keep you from waiting, iScout will email you when the files are created and ready for download.

Graphical user interface, text

Description automatically generated

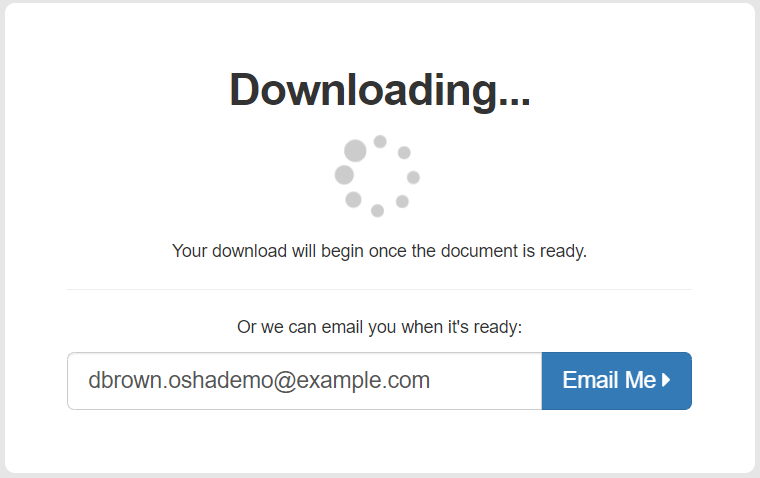
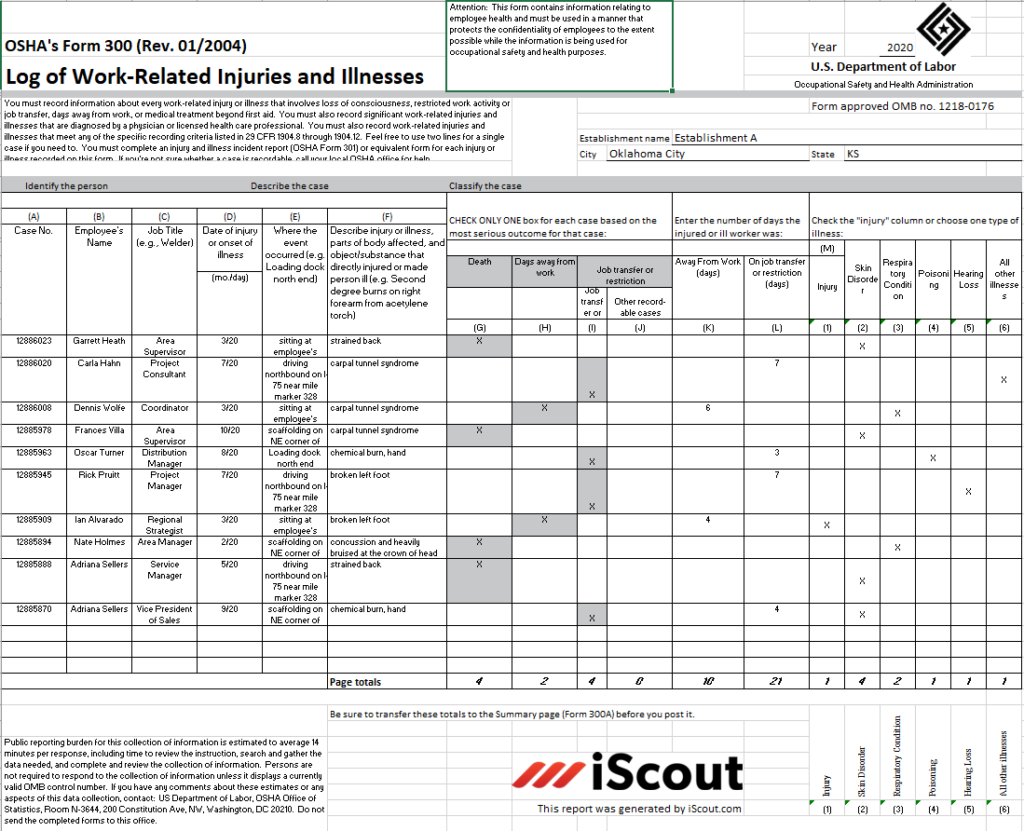
Once you have completed your downloads, they will be in Excel, in the OSHA Recordkeeping format you are used to seeing.

Table

Description automatically generated

REVIEWING COMPANY METRICS

Also, on the DASHBOARD, you can review and analyze safety metrics like TRIR, DART and SEVERITY in real time.

The OVERVIEW tab shows these rates in a trending line graph over the entire year, as well as a bar graph.

Chart

Description automatically generated

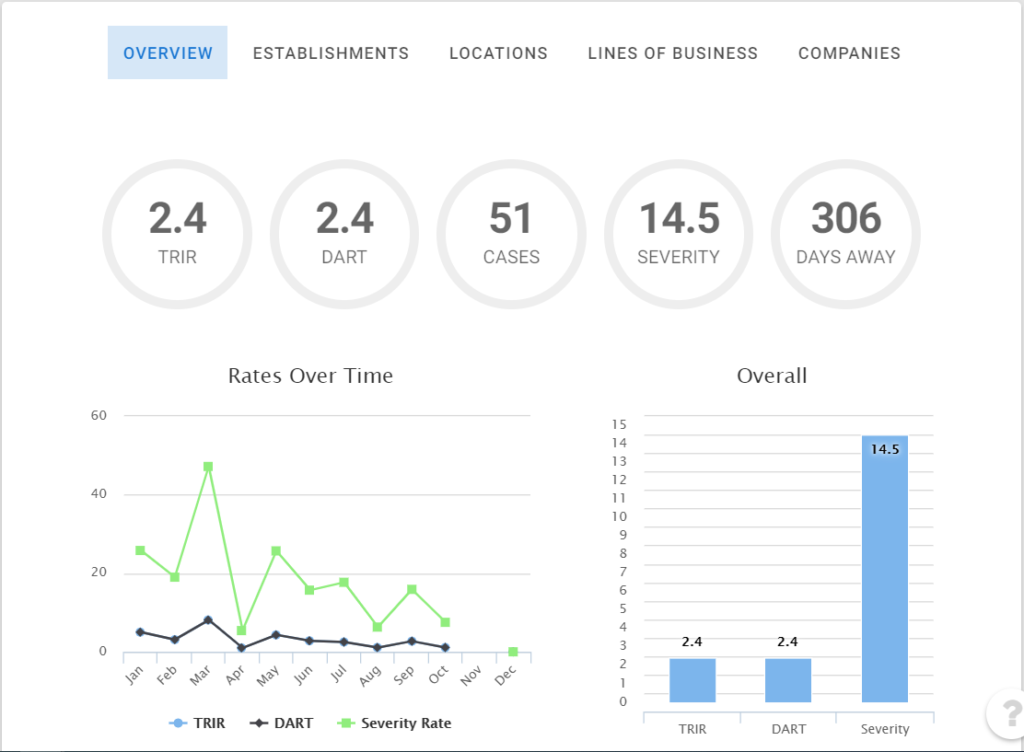
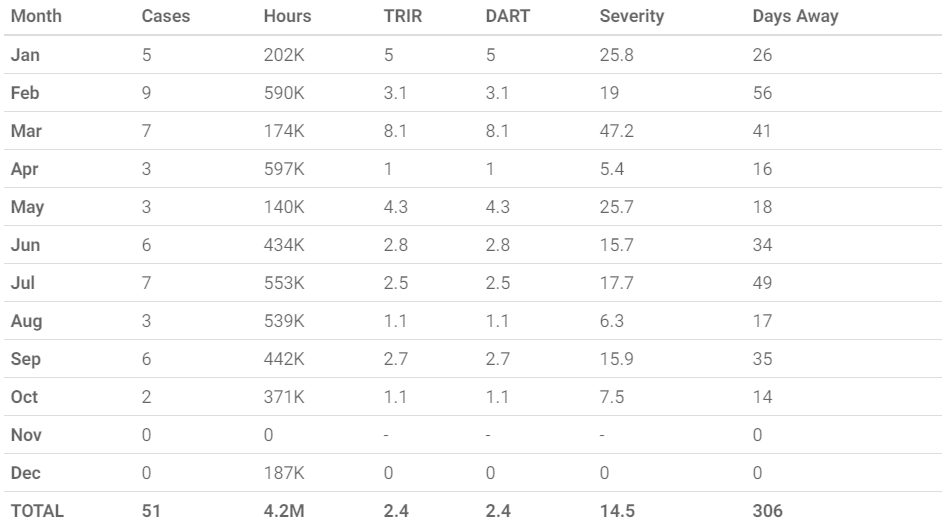
There is also a chart that details the total number of cases, hours, metrics, and days away for each month, and the entire year.

Table

Description automatically generated

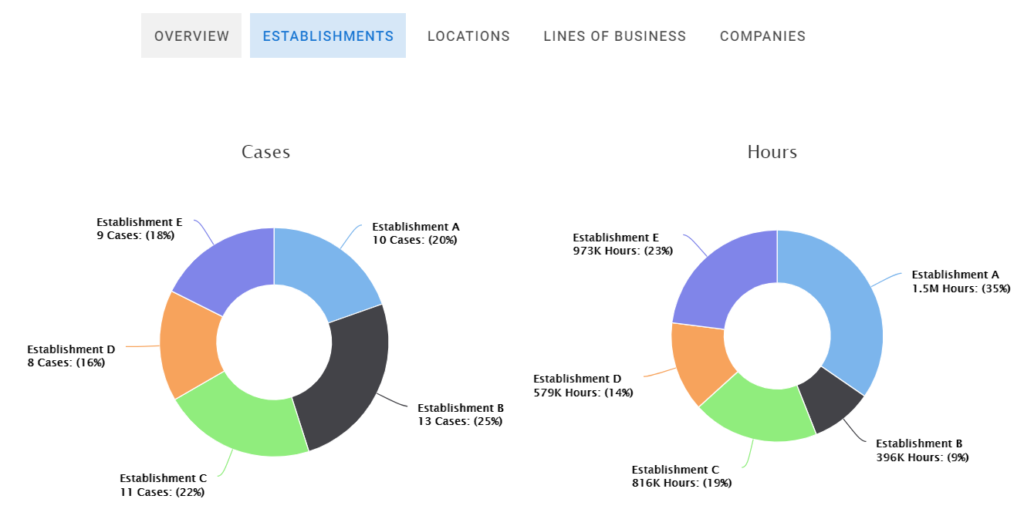
The ESTABLISHMENTS and LOCATIONS headings allow you to see the number of cases and hours per Establishment or Location that year in a pie graph type view.

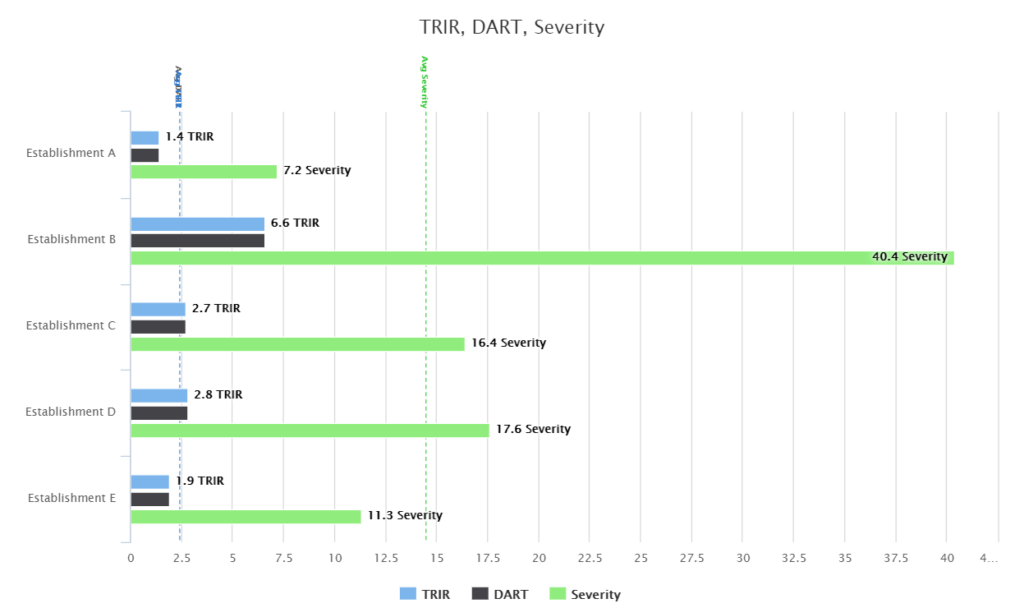
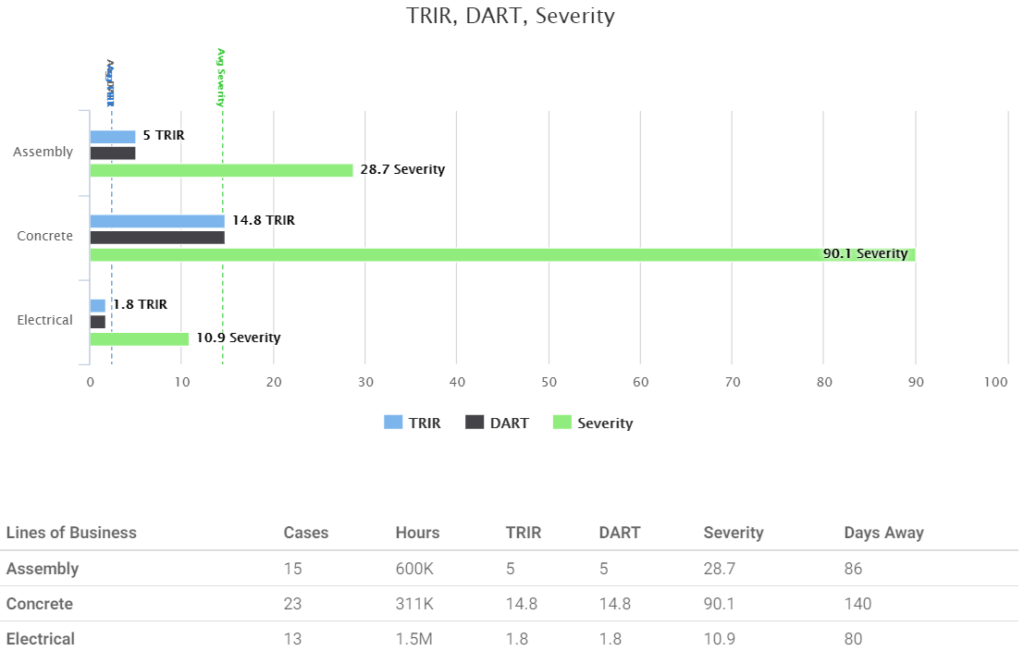
A bar graph shows TRIR, DART and Severity for each Establishment or Location, along with a Company Average line for comparison.

And a chart that details the total number of cases, hours, metrics, and days away for each Establishment or Location for the year.

Table

Description automatically generated

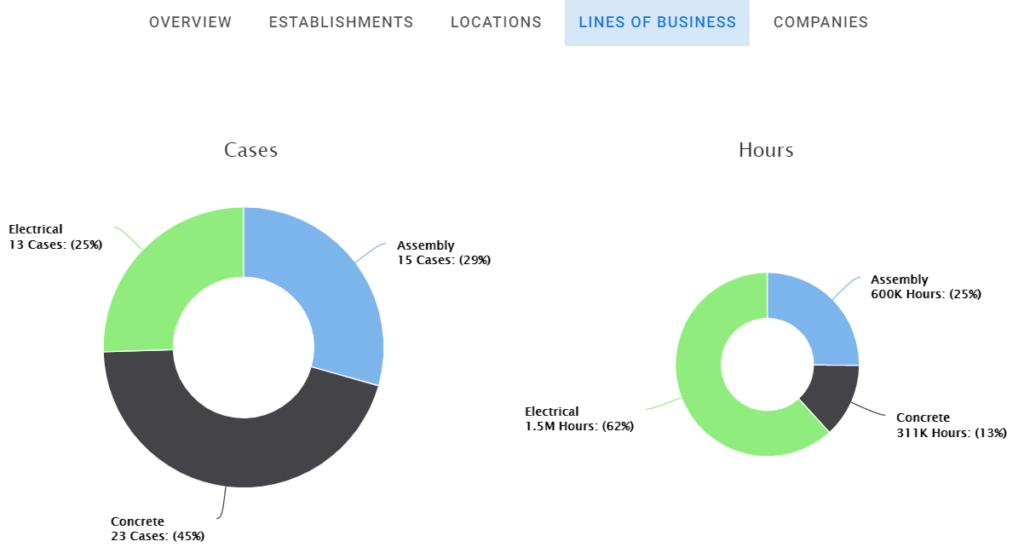
The LINES OF BUSINESS header allows you to see the number of cases and hours per Line of Business in the different graph formats.

The COMPANIES header allows you to see the number of cases and hours per Company in the different graph formats.

REPORTING AND NOTIFICATIONS

As with all data captured in iScout, it’s easy to export that information into PDF reports.

NOTE: To view or receive reports of OSHA data, you must have the OSHA Case Management permission granted to you.

In the DASHBOARD, click the REPORTS button to view the Responses of the OSHA Recordable Incident Form. 

Because this behaves just like a regular Form in your site, you can analyze form responses and export data to a PDF or Excel document.

By clicking OSHA Overview, OSHA Establishments, OSHA Locations, OSHA Lines of Business, or OSHA Companies in the trend bar, you can export those metrics to a PDF report. 

Click here for more information about Viewing and Analyzing Responses.

This information can also be sent on your schedule using the Rules Engine.

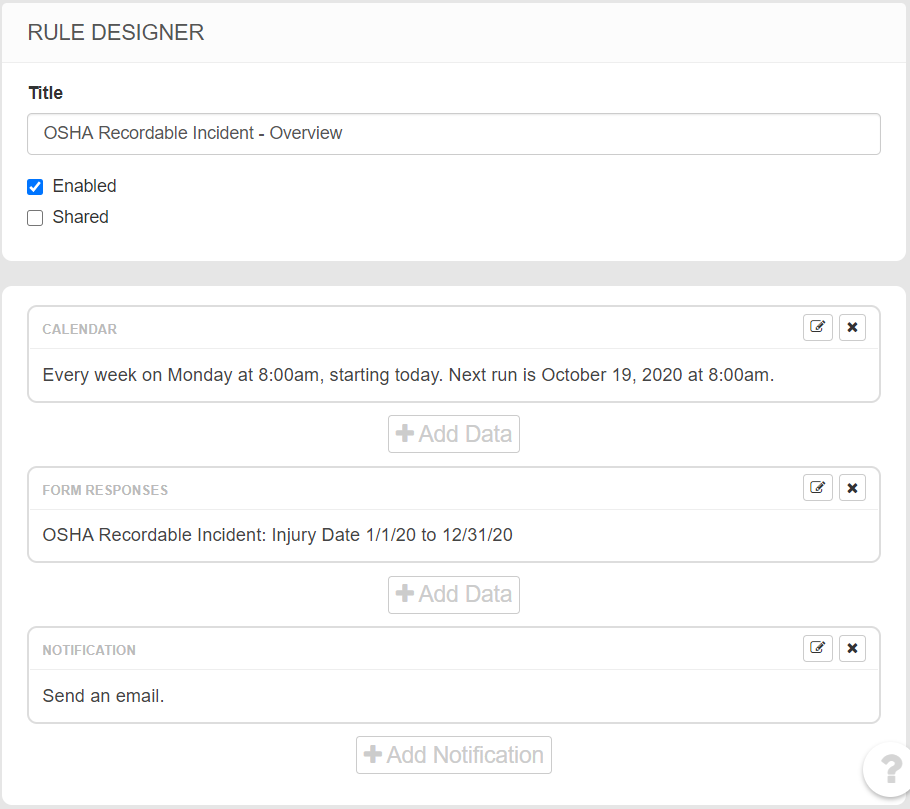
Navigate to Control Panel > Rules > + Add to create a new Rule.  In the example below, a Rule titled OSHA Recordable Incident Overview has been created and set up to

  • Send an Email
  • Monday mornings at 8:00
  • Include a PDF Overview of all OSHA Recordable Incident forms, with an Injury Date between 1/1/2020 and 12/31/2020 

Click here for more information about the Rules Engine.

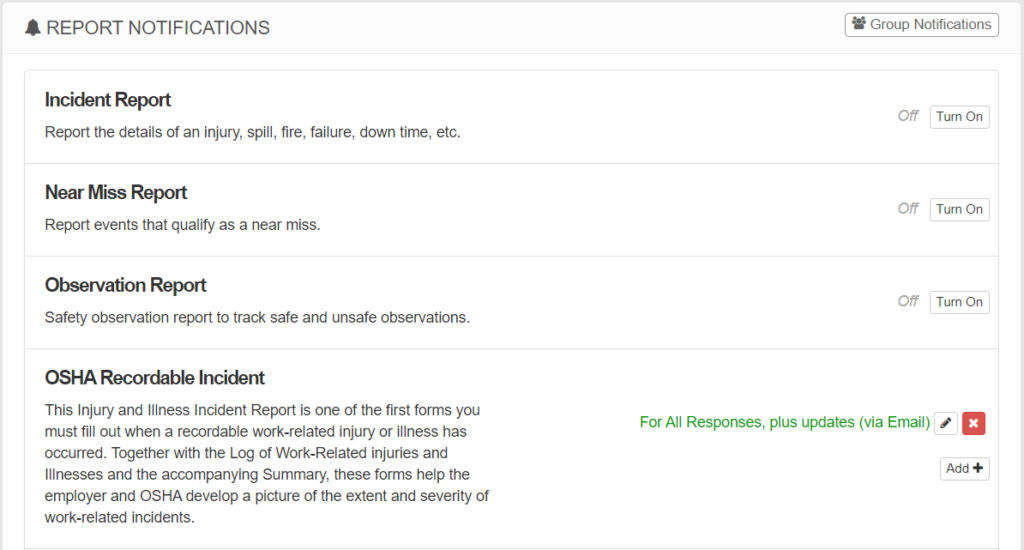
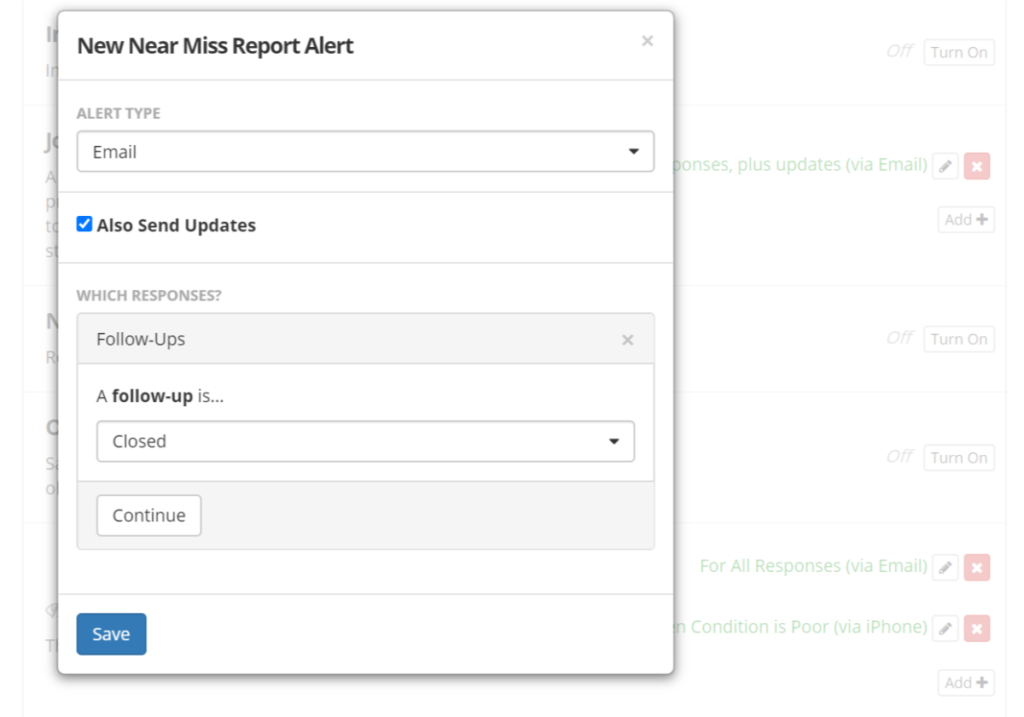
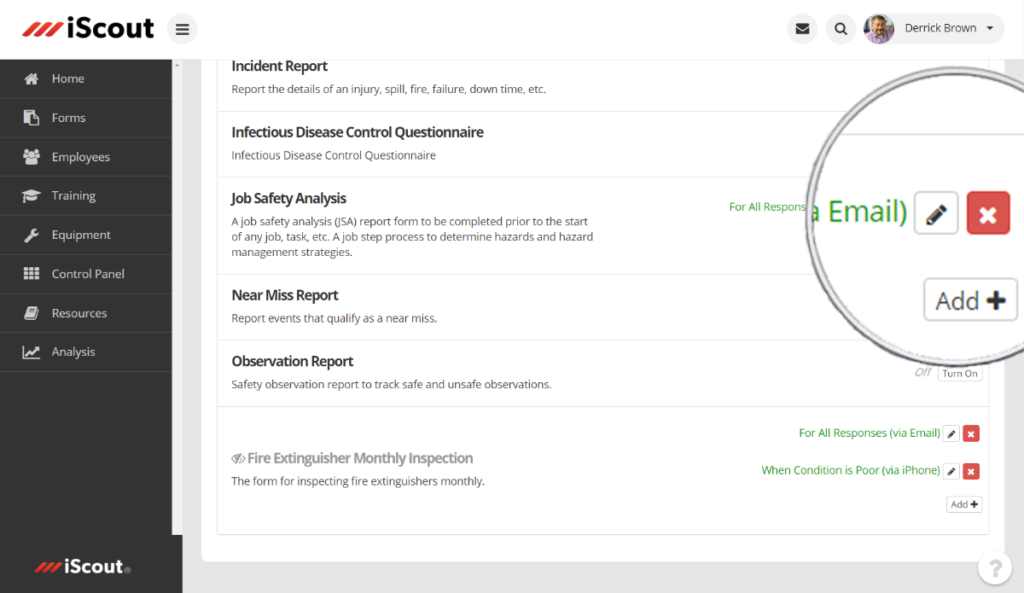
Just like with other Forms, you can also set up Notifications for individuals or groups of employees to receive an Email or Mobile message anytime an OSHA Recordable Incident form is submitted or updated.

Click here for more about Setting Up Report Notifications.

Graphical user interface, text, application, email

Description automatically generated

How To Fix The Browser Security Error

Starting in September of 2020, iScout is discontinuing support for TLS 1.0 and 1.1 in favor of TLS 1.2. These outdated protocols are insecure and are being discontinued by many other groups (such as Microsoft 360 starting in October).

NOTE: iScout began showing full screen warnings on every page starting in early August. An email was also sent to IT groups several weeks in advance.

If you are unable to connect, you may see an error message like this:

To fix this error, you need to enable TLS 1.2 in your browser settings. Here’s how…

1) Click the settings icon at the top-right, then click “Internet Options”:

2. Click the “Advanced” tab and scroll to the very bottom.

3. Check “Use TLS 1.2” then click “Apply”:

4. Now restart your computer and you will be able to connect to iScout.

If you are unable to change these settings, they may be controlled by your company’s IT group. You will need to contact your IT group for assistance.

Please contact [email protected] with any questions.

What’s New in iScout

This week we’ve added several new features. Email [email protected] if you have any questions.

Notifications For Closed Follow-Ups

Now you can schedule notifications to occur when Follow-Ups are closed. You must also have the ‘Also Send Updates’ box selected.


Negative Conditions

When creating limitations for employees, form visibility, training assignments and acknowledgement recipients, a new reverse icon allows you to create the negative of the condition you select. For example, instead of choosing all of the teams to receive an alert, you can select the teams NOT to receive it.


Assign Inspections To Individuals

You can assign asset and equipment inspections to different users. For example, a Daily Vehicle Checklist might be filled out by the driver, but the Monthly Inspection is performed by a safety supervisor.


Resource Edit Permission

Editor Roles allows roles to create and edit resources for a particular tag.


Data List Directory

Data list items now include a directory of places they are used throughout your site.


Edit Existing Notifications

Now you can easily make edits to existing notifications. Click the edit icon to adjust conditions for the notification.


Training Status Report

Columns for the names of Deficient and Expiring training requirements can be added to the Training Status Report.


LEARN MORE

If You Can’t Stand The Heat, Get Out The Heat Management Plan

Safety professionals understand the hazards that exist when workers are exposed to hot conditions. The most recent OSHA U.S. Heat Fatalities Map shows there were 109 heat-related worker deaths from 2008 to 2014. Employees must be adequately trained and equipped to take proactive measures against heat stress, such as drinking plenty of water, wearing loose and light clothing, or taking regular breaks.

Heat Stress

“Heat stress” is a term that includes several different physical reactions that can occur as the human body attempts to regulate its temperature. These physical reactions range from discomfort to death.

Common symptoms of heat stress include heat rash due to sweating and clogged pores, heat cramps due to the loss of electrolytes from sweat, and heat exhaustion. These issues might not seem particularly threatening on the surface, but they often lead to worker irritability, low morale, absenteeism, and shortcuts in procedures.

On the other end of the spectrum, heat stroke is a true medical emergency. Heat stroke occurs when the body becomes unable to regulate its temperature, and the condition can be fatal.

Risk Factors

Certain environmental, physical, and procedural factors affect how safety professionals can address heat-related hazards. The primary concern is to maintain the body’s core temperature at or near the normal level which is approximately 98.6 degrees Fahrenheit.

The risk factors hindering normal body temperature include:

  • Temperature of the work site
  • Relative humidity
  • Personal protective equipment (PPE) that can interfere with the body’s ability to cool itself through sweating
  • Employee workload
  • Employee’s age, drug use, body weight, cardiovascular fitness, and underlying health problems
  • Lack of proper training on heat stress

Signs Of Heat Stress

Early detection is a key factor in preventing heat stress. Properly training employees and supervisors to identify the signs of heat stress can greatly reduce the risk of negative physical responses to heat and prevent heat stress from worsening to heat stroke.

Employees should be trained to watch for the following signs of heat stress:

  • Sudden, severe nausea, or headaches
  • Increased incidents or absenteeism
  • Chronic fatigue
  • A lack of alertness

There are several methods of assessing the risk of heat stress for employees. One is to consider the wet bulb globe temperature (WBGT) of a work environment – which factors the temperature, humidity, air movement, and radiant heat sources – compared with the occupational exposure limits (OELs) recommended by organizations such as the National Institute for Occupational Safety and Health (NIOSH).

Another method is to utilize the free National Weather Service Heat Index, which can help determine the likelihood of heat stress using relative humidity and temperature data. There are also free tools available, like the U.S. Army’s urine color chart that can be used to gauge the level of worker hydration, and OSHA’s Heat Safety Tool App that features real-time heat index information, precautionary recommendations for specific risk levels, and a guide for identifying signs and symptoms of heat-related illnesses.

Heat Stress Prevention

Workers need to understand the danger of heat stress – the signs, the symptoms and prevention strategies. Supervisors need all the worker training, plus an understanding of the importance of fluid replacement, adjusting procedures for non-acclimatized workers, and how to identify the risk factors of heat stress.

OSHA recommends that new workers and those returning from a break should begin with 20 percent of their usual workload on their first day, increasing by no more than 20 percent on each subsequent day. In the case of a rapid temperature change, OSHA says an appropriate acclimatization program might require even experienced workers to start with 50 percent of their normal workload, increase to 60 percent on the second day, 80 percent on the third day and 100 percent on the fourth day.


Daily tasks to consider to help employees avoid heat stress.

  • Evaluating work site conditions and assessing heat risks
  • Ensuring water is available and sanitary
  • Actively encouraging workers to drink water regularly
  • Scheduling hot or physically demanding jobs for the coolest parts of the day
  • Implementing mandatory work/rest schedules
  • Creating a “buddy system” for workers to watch out for each other
  • Installing shade canopies
  • Providing air-conditioned trailers or break rooms
  • Utilizing warm-weather PPE

QR Codes for Employees / Equipment (Video)

KPA EHS automatically assigns a QR code to employee profiles and to equipment profiles. These codes can be scanned within the KPA EHS app to quickly view a profile, complete an inspection, etc.

PRINTING EMPLOYEE ID CARDS

You can export employee profiles to a PDF that is pre-formatted to the ID card standard. Here’s how:

  • Go to the Employees search page
  • Search for the employee(s) that you wish to print
  • Press the arrow next to Search and choose ID Cards
  • The search results will then be exported to a PDF
  • If the employee has a photo on file, it will be included (otherwise a generic avatar is shown)
  • NOTE: It is not possible to use your own information or QR code 

PRINTING EMPLOYEE ID STICKERS

You can also export employee QR codes to a PDF that is pre-formatted to various label sizes. Here’s how:

  • Go to the Employees search page
  • Search for the employee(s) that you wish to print
  • Press the arrow next to Search and choose Stickers
  • Select the size of stickers based on standard Avery label templates
  • The search results will then be exported to a PDF

NOTE: It is not possible to use your own information or QR code

PRINTING EQUIPMENT QR STICKERS

You can export equipment QR codes to a PDF which is easily printable on standard Avery Templates. Here’s how:

  • Go to the Equipment page and search for the equipment that you wish to print
  • Click Export on the right side and choose Stickers
  • Select the size of stickers based on standard Avery label templates
  • Choose the number of stickers per piece of equipment to print
  • The search results will then be exported to a PDF

We recommend black laser ink on white glossy paper where the QR code is at least 1.25″. Here is a link to weatherproof labels that works with our 21 Per Sheet template: https://www.onlinelabels.com/products/ol5350?src=dlc-410

Four Keys to Managing the ‘New Normal’

Back to Work Safely with iScout

As we return to work, it’s clear that business is at the forefront of managing the COVID-19
pandemic. To keep people safe and a company operating successfully, businesses require detailed situational awareness to adhere to diverse and shifting guidelines across multiple regions. Challenges like limited group size, travel restrictions, and more, create hurdles to business as usual, but also opportunities to adapt and improve moving forward.

Businesses need a strategy, a way to implement the strategy, and tools to measure its effectiveness. iScout is ready to help businesses achieve the four keys to getting back to work: Communicate, Organize, Execute, and Verify.

iScout allows users to establish and implement return to work readiness plans, make data driven decisions, and take real time action when necessary. The highly configurable nature of the platform lets each customer launch unique, business specific strategies to help keep workers safe and informed, as well as compliant with guidelines and restrictions.

Four Keys to get Back to Work

1. Communicate

2. Organize

3. Execute

4. Verify

Communicate with iScout

Notices

Share a quick message with your team on the iScout home screen or in the free iScout apps for iOS and Android. Messages can include formatting such as headings, colors, bold, italics, lists, and more. Also include links to documents or other workflow processes.

  • Post pertinent information to employees
  • Provide safety, HR or operational reminders
  • Give quick access with clickable links
  • Post real time updates in app and website
  • Provide easy access to emergency response management

Acknowledgements

Acknowledgments allow for quick information sharing and confirmation of receipt. Optionally, they can include attachments and require electronic signatures if desired. iScout tracks which employees have signed off, and which have not.

  • Send safety and operational reminders
  • Obtain and store a confirmation receipt of new or changed policies
  • Effectively communicate from a distance, and verify acceptance

Organize with iScout

Resources

Share an unlimited library of PDF, Word, Excel, PowerPoint, videos, and documents with team members – both in-house and in the field. Typical documents include standard operating procedures (SOPs), employee handbooks, safety data sheets (SDS sheets), emergency contact lists, client policy documents, and more.

  • Avoid the paper distribution of documentation
  • Create a central point of access for all types of documentation
  • Post emergency management protocols, policies or other important documents

Equipment & Assets

iScout’s Asset Management lets users track and complete inspections for any type of asset. Create the inspection form, schedule when they’re due, assign responsibility, and iScout will automatically track status and assign tasks to keep things running smoothly.

  • Manage facility cleaning & disinfection procedures and checklists
  • Create app-based access to asset information
  • Coordinate facilities and employee shift-based responsibilities

Driver Qualifications

The Driver Qualifications add-on in iScout simplifies the process of creating and maintaining DOT driver files, such as medical examiner’s certificate, motor vehicle reports, driver’s certification of violations, and other required documents according to FMCSA 49 CFR 391.

  • Create quick access for drivers to view documentation
  • Avoid in-person interaction or handling of paper copies
  • Provide alerts for expiring documents

Execute with iScout

Open Tasks

iScout maintains a proactive list of Open Tasks for each user on the home screen and in the app. The number of open tasks is also shown as a badge on the app icon, making it clear the system needs their attention. Tasks are automatically generated for things like training, inspections, follow-ups, acknowledgment sign-offs, and more.

  • One place for tasks and communications
  • Employees know when training is due and stay current
  • Users easily manage inspections of assigned equipment
  • Mobile access with or without email

Forms

Build any paper form into iScout using the form builder. Create audits, inspections, incident and observation reports, daily questionnaires, and more. Forms can be simple with just a few questions or complex to capture more in depth data.

  • Go paperless with forms, reports, and checklists to avoid contact
  • Create an employee wellness assessment to determine suitability for returning to work
  • Confirm PPE utilization and social distancing measures
  • Set instant alerts for non compliance or high risk responses
  • Create a contact tracer (manually track health related interactions to minimize the spread of COVID 19
  • Provide cleaning & disinfecting checklists for facilities, equipment, etc.
  • Import COVID focused forms from the Library and edit as needed

2020 Training

Training needs to be conducted without gathering employees in large groups or classrooms. 2020 Training offers a pre-built library of lessons (over 60 lessons and growing). Easily change the text, quiz questions, narration, or any other element of the training lesson. Another option is to create custom content, and allow for easy completion through the website or app.

  • Quickly create relevant monthly safety meetings and avoid classroom settings
  • Train up your workforce to meet new business demands
  • Review previous incidents, ongoing prevention strategies, and best practices
  • Create operation and procedural refreshers

Verify with iScout

Alerts

Keep the team informed of system activity in real time through email or push notification. Users can set notification criteria to receive alerts of information most important to them. Alerts in iScout increase awareness and quicken action.

  • Receive instant updates from the field for any type of response
  • Notifications can be sent based on concerning situations,employees, or other hazardous situations
  • Receive copies of form responses, including wellness questionnaires, training reports, equipment statuses, and more

Reporting

Data drives decisions. iScout users can automate the reporting process and provide their employees the data they need to quickly make informed decisions. iScout users can setup daily, weekly, monthly, or even annual reports that automatically get emailed to the team.

  • Start of day report of employee health information
  • Confirm equipment is being cleaned & disinfected before and after use
  • Schedule a weekly report to verify employees are current on training
  • End of day report of overdue employee tasks

Question of the Day

The QOD feature, which is part of 2020 Training, is a training component designed to take seconds to participate. Enhance a training curriculum by scheduling simple, daily questions to your team. Content is received through email or push notification. Participants review the information, select an answer, and view the leaderboard. QOD lets supervisors continually verify training competency in small doses throughout the week.

  • Provide quick safety and operational reminders, reinforcing back to work procedures and protocols
  • Create engagement among participants
  • Enhance a training curriculum with bite sized information specific to the immediate issues

Calculation Fields in Forms (Video)

Calculation fields let you use other fields in a formula to derive a new number.

For example, say you have a counter field called “quantity” and a numeric field called “price”. You could create a calculation field called “Grand Total” with the formula quantity * price.

Overview

Here is a brief video overview of the basics:

Please watch the above video to understand the basics of calculation fields. Here are some more advanced examples.

FUNCTIONS

Along with variables and simple math operators (like + and *), you can use functions like round as part of your formula. You can see a complete list of available functions here but the common ones are: abs, ceil, cube, exp, floor, log, log10, log2, max, min, pow, sqrt, square, random, sin, cos, and tan.

Punch Clock

Say you had two Date/Time fields – both set up to track date and time. One called “Punch In” the other “Punch Out”.

Assign variable names to each field punch_in and punch_out – and now they can be used in a calculation. Create a new calculation field called “Hours”. Then edit the formula like this:

A date/time field will come in as the number of seconds since 1970. So punch_out - punch_in is the number of seconds between punch in and punch out. Then we divide by 60 * 60 which is the number of seconds in an hour. The calculation will now report the number of hours:

Days Away From Work

Some reports need to calculate the number of days between two dates. So create two date fields, start and end, then subtract those two fields:

Here’s how that would end up looking:

Overtime Hours

Let’s say you want a special field that shows overtime hours (anything over 8 hours). First you’d have a field where they’d enter total hours. This could be a numeric field, counter, or even a calculation based on a punch clock. In this example, we’ll use a numeric field. Then we’ll add a calculation field that uses a formula to show overtime:

This formula uses the max() function which evaluates to which ever number is larger. So if total_hours is less than 8, it will evaluate to 0. Here’s how it would look:

Visibility Settings

Adding to the previous example, say we want a manager to sign off if there are 4 or more overtime hours. We can add a signature field that only shows up when necessary. First create the signature field and set it as required:

Now we’ll edit the Visibility of that signature field to only show up if “Overtime Hours” is 4 or more. So Edit the signature field and click the visibility tab. Now add a condition, choose “Overtime Hours”, set “4” as the minimum value, and press Continue. Now the signature will only show when necessary:

Known Limitations

Many formula are possible with calculation fields, but the following are not currently possible:

  • Using the calculation in association with Scoring
  • Using calculation fields as a sub-field of counter fields
  • Using counter sub-fields as variables in a calculation
  • Using a select field’s value as a variable in a calculation

QR Code Reader (iPhone / Android)

KPA EHS automatically assigns a QR code to employee profiles and equipment.

Once a QR code is printed, it can be scanned via any QR reader, including the KPA EHS app. The advantage of scanning a code within the app is that you will be automatically authorized to view protected content (e.g. you will not have to login again if you are already authorized).

When you are ready to scan a code, open the KPA EHS app and select “Code Scanner”.

Point the camera at the QR code and it will be automatically detected.

KPA EHS recommends that QR codes are printed on white, glossy material with a width and height of at least 1.5 inches. Keep in mind that older devices (especially Android) may not have a built in auto focus and may struggle to scan especially small codes.

NOTE: Stickers and ID Cards can exported to various templates for printing via the Equipment and Employee Search pages on the website.