Languages / Translations

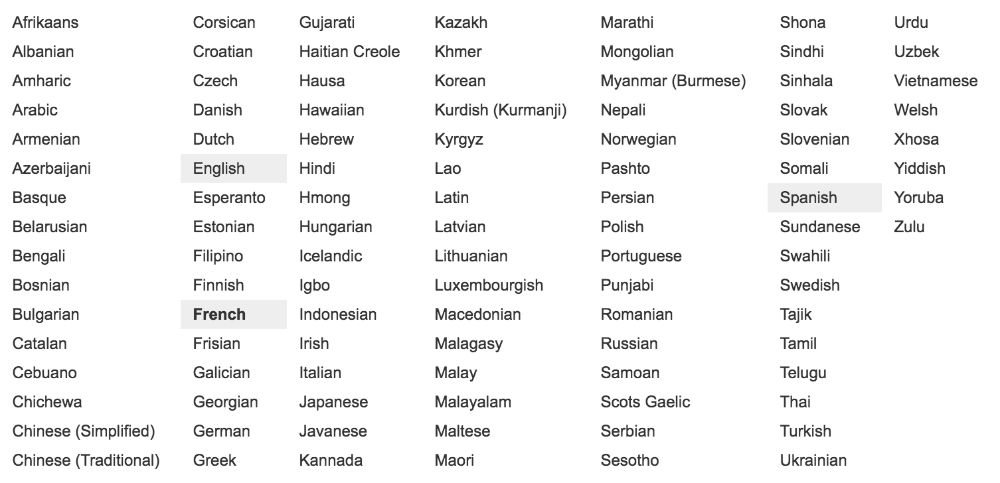
The iScout website offers automatic translation into over 100 different languages including:

To select a different language:

  • Login to the iScout website
  • Click “My Profile” (top-right)
  • Scroll to the “Language” section
  • Choose the language of your choice

Here is an example:

For narration on online training, iScout supports the following languages:

  • Arabic
  • Chinese
  • Danish
  • Dutch
  • English
  • French
  • German
  • Hindi
  • Italian
  • Japanese
  • Korean
  • Norwegian
  • Polish
  • Portugese
  • Romanian
  • Russian
  • Spanish
  • Swedish
  • Turkish
  • Welsh

Custom Employee Fields

A standard Employee Profile keeps track of information like Job Title, Location, Line of Business, etc. Adding Custom Employee Fields allows you to keep track of data for employees not included in the default list.

NOTE: To add or edit Custom Employee Fields, you must have the Design Custom Employee Fields permission granted to you.

ADDING CUSTOM EMPLOYEE FIELDS

You add as many custom fields to the profile page as you need. Here’s how:

  • Navigate to Control Panel > Employee Settings
  • Here, you will see any Custom Fields already created.  You can Edit or Remove these at any time.
  • To create a new Custom Field, click +Add
  • Provide a Field Name, then choose the Field Type
  • There are 4 types of Custom Fields
    • Text, where you type in any text
    • Numeric, where you type in a number
    • List, pulls from a Datalist already in the site
    • Date, like a birthday or anniversary
  • If List is selected, choose from the options provided
    • For more information about creating and utilizing Datalists, click here
  • Be sure to click Save at the bottom of the page to save your new settings

ADDING DATA TO CUSTOM EMPLOYEE FIELDS

NOTE: To view and edit Employee Profiles, you must have the proper permissions granted to you.

Now that the Custom Fields are added to the Employee Profile, you can add data to those fields. Here’s how:

  • Search for an individual employee 
  • Click Edit, make appropriate changes, click Save Changes

You can create or update a large number of employee profiles using iScout’s Dataload module.  For more information about completing a Dataload, click here.

USING CUSTOM EMPLOYEE FIELDS

Now that the Custom Fields are added to the Employee Profile, you can use that data in a variety of ways.  

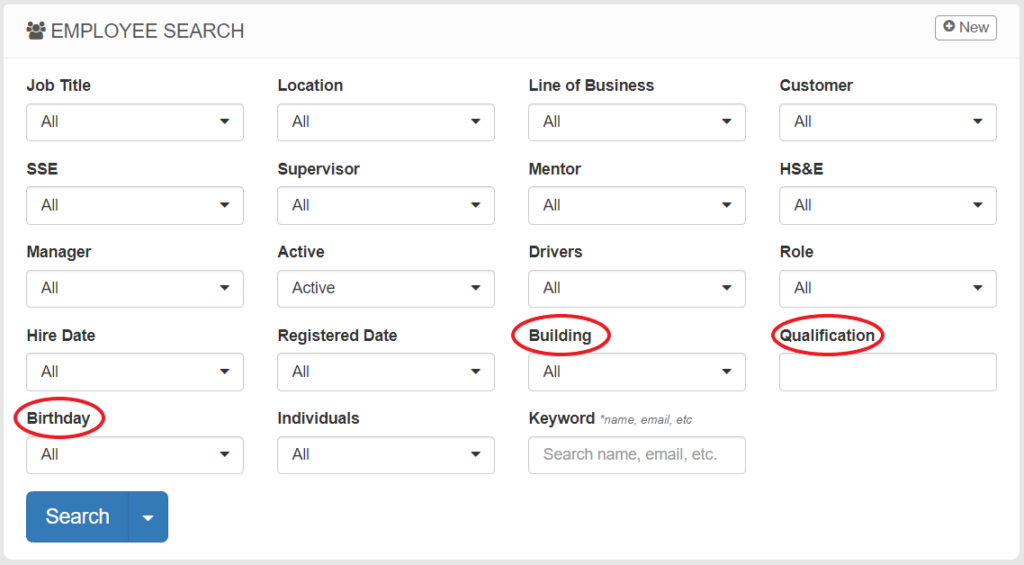
In the Employees module, you can now filter, search, and create reports based on Custom Employee Fields.  In this example, the Building, Qualification, and Birthday fields are custom and become filters.

A close up of a map

Description automatically generated

In the Training module, Custom Employee Fields that pull from a Datalist can be set as a condition for training requirements.  In this example, the training topic is required for all employees working in the North Building.

To edit a training assignment:

  • Navigate to Training > Edit Trainings > Click Edit next to the topic
  • Under the WHO IS THIS ASSIGNED TO? Section, click Limited and choose the condition from the profile
  • Select from the list and click Continue
  • Click Save at the bottom of the page to save changes

For more information about assigning training topics, please click here.

How To Use Data Lists

iScout has built-in lists such as employees, equipment, field-offices, lines-of-business, and customers.

At some point, there may be additional lists that you need to keep track of such as “Regions”, “Buildings”, “Shifts”, etc. These are called 
data lists.

For example, you may have a few reports where the employee selects a “Region”. You could embed your list of regions directly within the report, but if you ever need to add a “Region” then you’ll have to add it on every single field in every single report. A custom data list would be a great fit here.


Creating a Data List

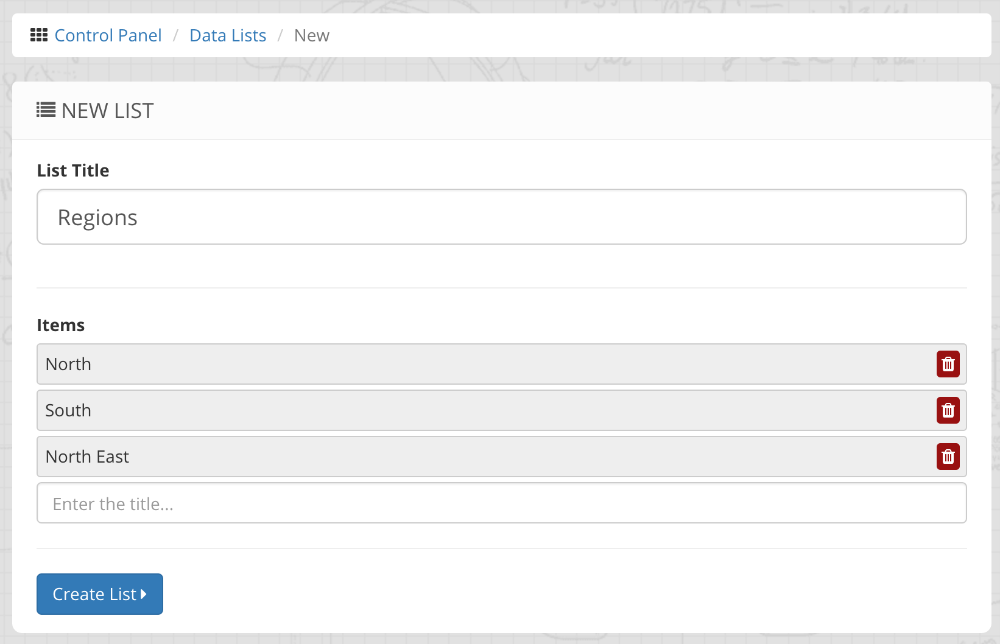
  • Click “Control Panel” > “Data Lists” > “+ Add List”
  • Enter a title for your list. e.g. “Regions”
  • Now list all of your items (aka regions). Press [ENTER] to add additional items. e.g. “North”, “South”, and “North East”


Updating Your List Items Via Dataload

If you have a large number of items in your list (or if it changes often) then you could use the 
DataListItem dataload to automatically keep your data lists up to date.


Using Your Data List In A Report

Now that you have created your data list, it can be used within a report. Any time the report is filled out, the list of options will be automatically up-to-date. Here’s how to use the new list:

  • Click “Edit” on your report
  • Click “Edit” on the field where your data list will be used
  • Click the “Settings” tab
  • Set the Source to your new data list
  • Press “Done” then “Save”

Marking Training Complete

Once you have setup your training, you will see open tasks for any required training. This training can be completed in multiple ways including:

  • Via the Employee Profile
  • Via a Lesson
  • Via a Group Training
  • Via a Dataload (Spreadsheet)

VIA THE EMPLOYEE PROFILE

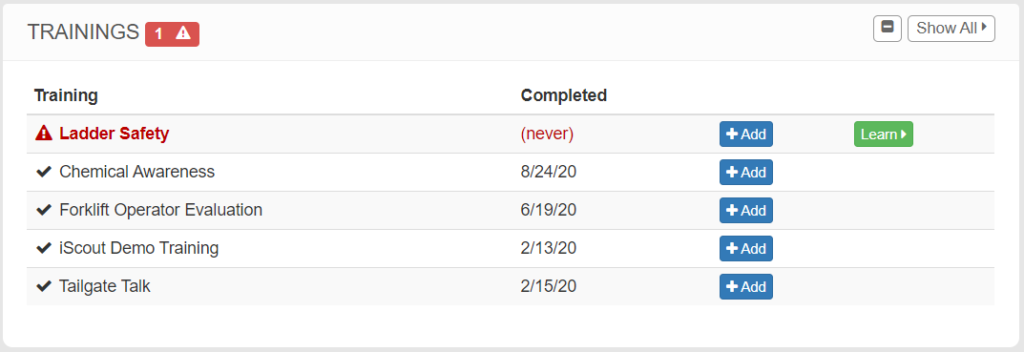
Open an employee’s profile and scroll to their “Training” section. You will see a red warning if they have any incomplete training. To mark a training complete, press the “+Add” button.

The profile only shows an abbreviated view of the employee’s training, so press “Show All” to view the entire training history for this employee. Here you can:

  • Press “+ Add” to mark a training as complete
  • Press “Mark Exempt” if an employee should be exempt from a training. (note: alternatively, you should probably edit the Training itself so that this employee was not required in the first place)
  • Click on any completion date to view the details and attachments (A PDF certificate is automatically generated for any completion)

You can also download an employee’s completions as a PDF report or Excel spreadsheet by pressing the “Export” button.

VIA A LESSON

If you associated a “Lesson” with a training, then the employee can press the open task in the Mobile App or on the iScout website to enter the lesson. Employees can also complete a lesson at any time by viewing their profile and clicking the “Learn” button next to the training.

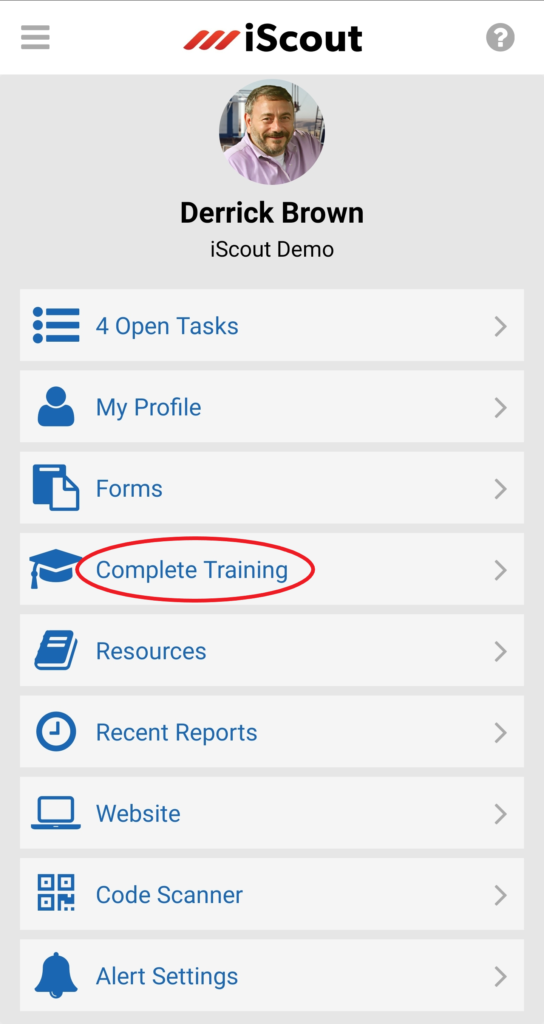
All available Lessons are offered on the Mobile App by clicking “Complete Lessons” on the home page of the app.

Once the lesson is complete, the training will be marked complete, the open task will be removed, and a certificate will be attached to their profile.

VIA A GROUP TRAINING

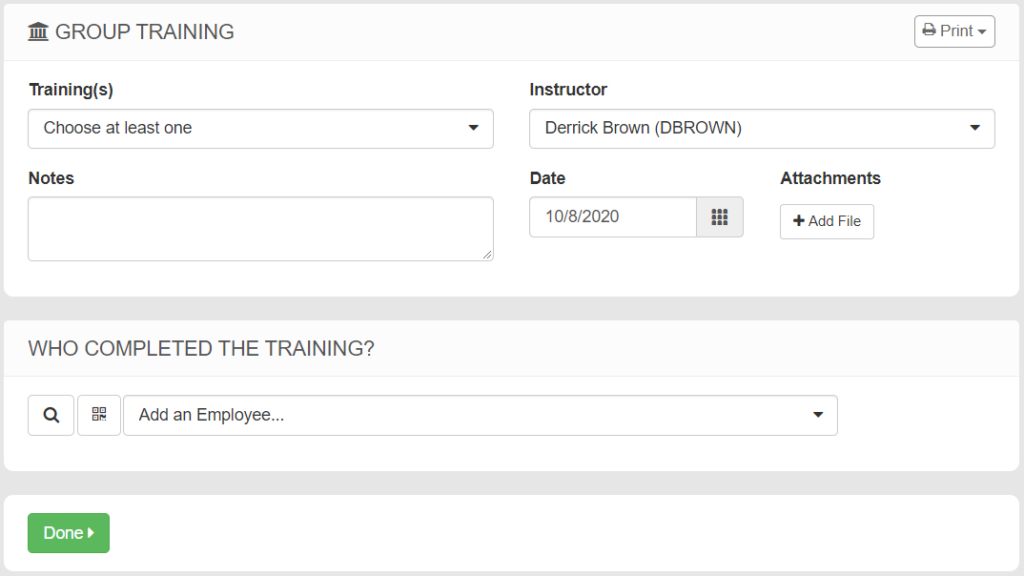
If a group of employees have completed a training on-site, you can create a record of that group-training. Once it is saved, a completion will be added to each employee’s profile for the specified training. 

  • Training(s) – The title(s) of the training topic(s) completed
  • Instructor – Employee name of the course instructor
  • Notes – For internal use, notes about the training
  • Date – Date that the training took place
  • Attachments – Can be used to upload documentation, roster, photos, etc.

WHO COMPLETED THE TRAINING?

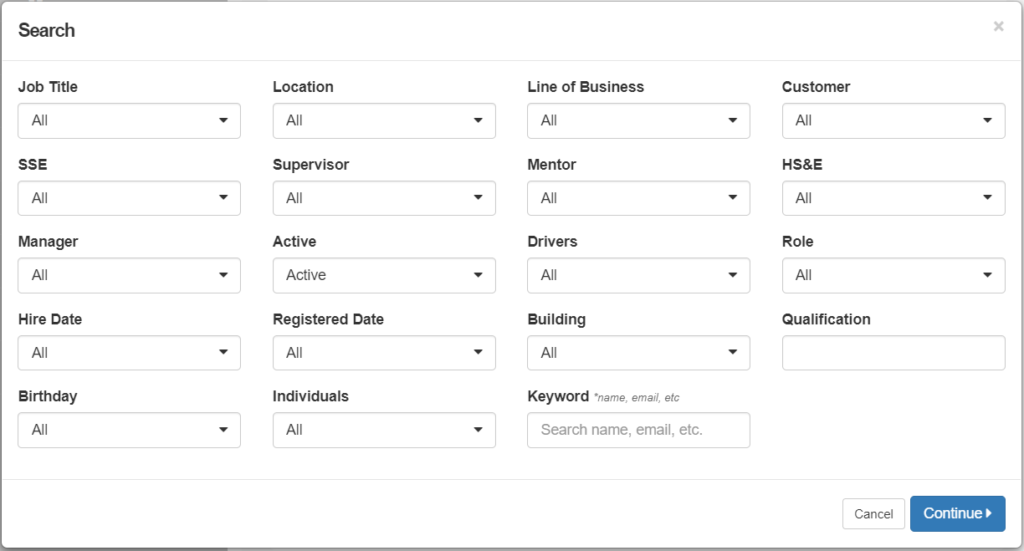
Click the magnifying glass icon to select the group of employees who will be attending the training.  Here, you can filter by data from Employee Profiles and this can be used to create a sign in sheet prior to the training.

Individual Employees can also be added by clicking the “Add an Employee” drop down, searching and adding other employees.

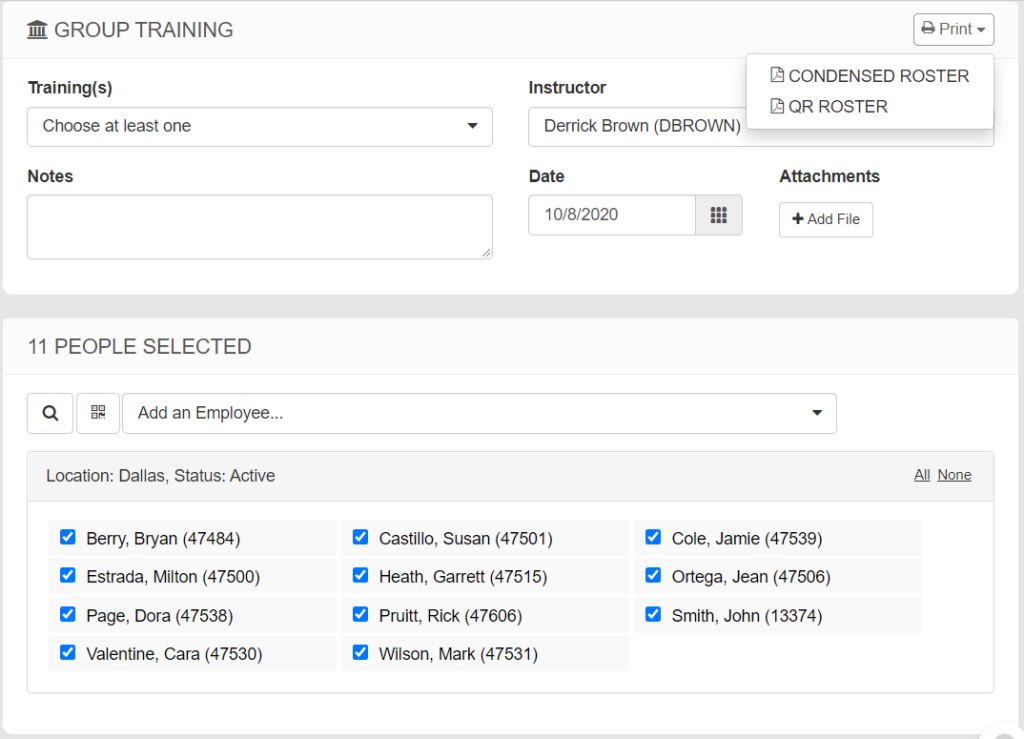
Once the employees who could possibly attend the training are selected, you can create a sign in sheet or roster. Click the “Print” button and select the type of roster to generate a PDF.  

  • A CONDENSED ROSTER will include the Training details, along with a single line of employee information (Name, Employee #, Location, Line of Business, and Signature).  
  • A QR ROSTER will include the Training details, along with QR Codes for each employee, along with their Name, Employee # and Signature line.

After the Training has been completed, the employees who did not attend can be removed, and additional employees can be added, if needed.  To save the training, click “Done” to update training records.

VIA A DATALOAD (SPREADSHEET)

You can also upload a spreadsheet of completed trainings. This can be useful for historic data or if there is a large group training that has been completed. For more information, visit the Dataload Completed Training page.

Creating a Lesson

For some trainings, you may wish to offer an online version of the training. This allows employees to complete training at their convenience and at any location.

NOTE: It’s important to understand the difference between a
Lesson and a Training in iScout. Trainings may or may not be associated with a lesson.

  • When a training does not have an associated lesson, there is no way for an employee to complete the training themself. The training is done offline and a iScout administrator must mark the training complete manually.
  • When a training does have an associated lesson, the employee is able to complete the training themself by viewing the lesson. 

Creating a Lesson

To create a lesson:

  • Click the “Control Panel” menu button
  • Click “Lesson Builder”
  • Click “+ New” to create a new lesson
  • Name – Choose a name for the lesson (this is often the same name as the training)
  • Description – Describe what will be taught within the lesson.
  • Modules – Create one or more videos, documents, text, or quiz modules (see below).
  • Press “Save” to finish

Types of Modules

There are four types of modules that you can include within a lesson: Video, Document, Text, and Quiz. You can include multiple videos, documents, quizzes, etc and the modules can be shown in whatever order you prefer.

Each module has a title which is shown on the left-side menu when the lesson is being completed.

Minimum Seconds

All modules allow you to set a “minimum seconds”. This number of seconds determines how long the employee must view the module before it is considered complete.

For example, if you set minimum seconds to 180 for a PDF document module, then the employee must have that PDF showing on screen for at least 3 minutes to complete that modules and ultimately pass the training.

You may optionally set the minimum seconds to “0” if you don’t want to required a minimum amount of viewing time.

NOTE: Be careful that you don’t set the time too long. It will be very irritating for someone if they’ve carefully read a document, yet are required to look at it longer for no reason.

Video Modules

Video modules allow you to embed a YouTube video within the lesson.

Once you have created your video, you need to upload it to your company’s YouTube account. It is not possible to upload the video directly to KPA EHS. YouTube is very good at efficiently streaming video, so we use their service.

If you don’t have a company account, then you can create one for free. If the video is not for public use, then make sure you set it to be “unlisted” (instead of “public”).

Once you’ve uploaded the video, simply copy & paste the URL for the video into the “YouTube Video” textbox. The video will be linked automatically.

Data Rates – Keep in mind that streaming YouTube videos can use a significant amount of data for mobile devices that are not connected to WiFi. For example, a 5 minute video played at 480p (quality) will use an average of 20 MB of data.

Document Modules

Document modules allow you to upload a Word Document, PowerPoint presentation, or PDF. This document is then shown to the employee and they are able to view it within the lesson (using a Google Docs viewer).

Text Modules

Text modules allow you to type text for the employee to read.

Quiz Modules

Quizzes allow you to verify that an employee has learned the necessary information from the training session. You can create one or more multiple-choice questions for the employee to answer.

Multiple Choice Format – For each question, you must list 2-6 six answers. You should also identify exactly one of those answers as being correct.
Random Answer Order – When the employee is taking the quiz, the answers will be displayed in a random order. This is to prevent an employee from “copying answers” from another employee or from simply memorizing the correct letters for the answers.
100% Correct Required – An employee is always required to get all of the answers correct in order to finish a training and earn a certificate. If an employee chooses an incorrect answer, they will be re-tested on the question at the end of the test. The answers are then shuffled so that the employee must understand the correct answer to get it right the second time. The employee’s completion certificate will also list the questions that were not answered correctly the first time.
What Is The Explanation? – The explanation is where you explain why the correct answer is correct. This is shown after an employee chooses an answer on the quiz.
Sending Acknowledgments

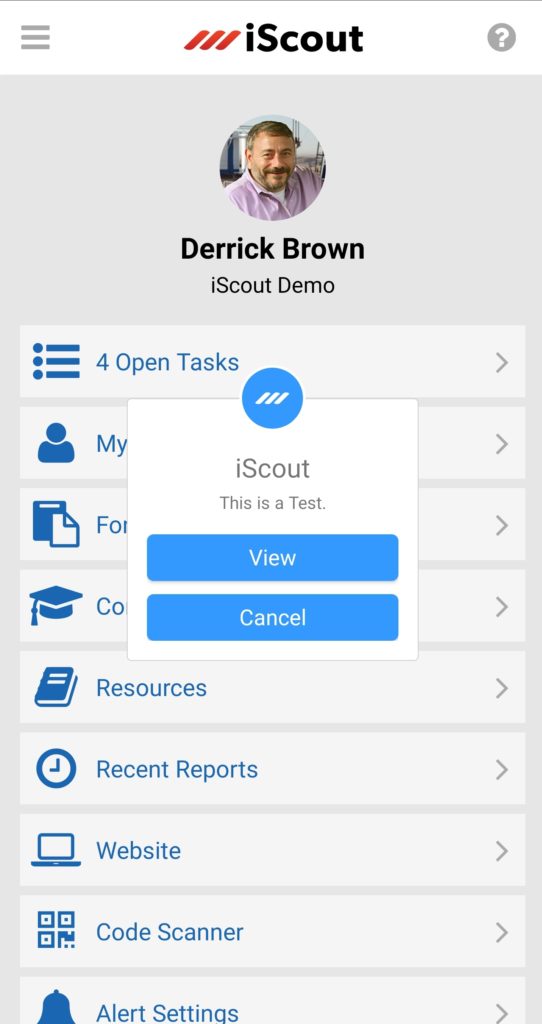
Acknowledgments are text notifications sent by a company official to some, or all employees. They can include an attachment and a short message. The system automatically creates an Open Task which is closed when the employee presses I Acknowledge This.

SENDING AN ACKNOWLEDGMENT

Here’s how to send an acknowledgment:

  • Navigate to Control Panel > Acknowledgments > +Send button in the top right corner
  • Enter the text for the acknowledgment.  This is the message that employees see when first opening the task and has a max of 240 characters.
  • Optionally add an Attachment, like a photo or PDF document.
  • If a signature will be required, click the Yes, Signature Required box.
  • Ongoing means that the Acknowledgment will automatically be sent to new employee profiles that match the criteria.
  • Assign an Expiration date if this Acknowledgment is only valid for a certain period of time.
  • Select who to send the Acknowledgment to.  This can go to Everyone in the company, or can be Limited to certain individuals, or other conditions like Job Title, Location, Line of Business, etc.
  • Click Send It Now
A screenshot of a social media post

Description automatically generated

NOTE: Acknowledgments are sent to an employee’s iPhone or Android device if they have push notifications enabled. Employees can also opt-in to receive emails for acknowledgments via their Notification Settings page.

REVIEWING A SENT ACKNOWLEDGMENT

You can always review the historical record of all sent Acknowledgments, see what was sent, when it was sent, the percentage of participation, and by whom it was sent.

A screenshot of a cell phone

Description automatically generated

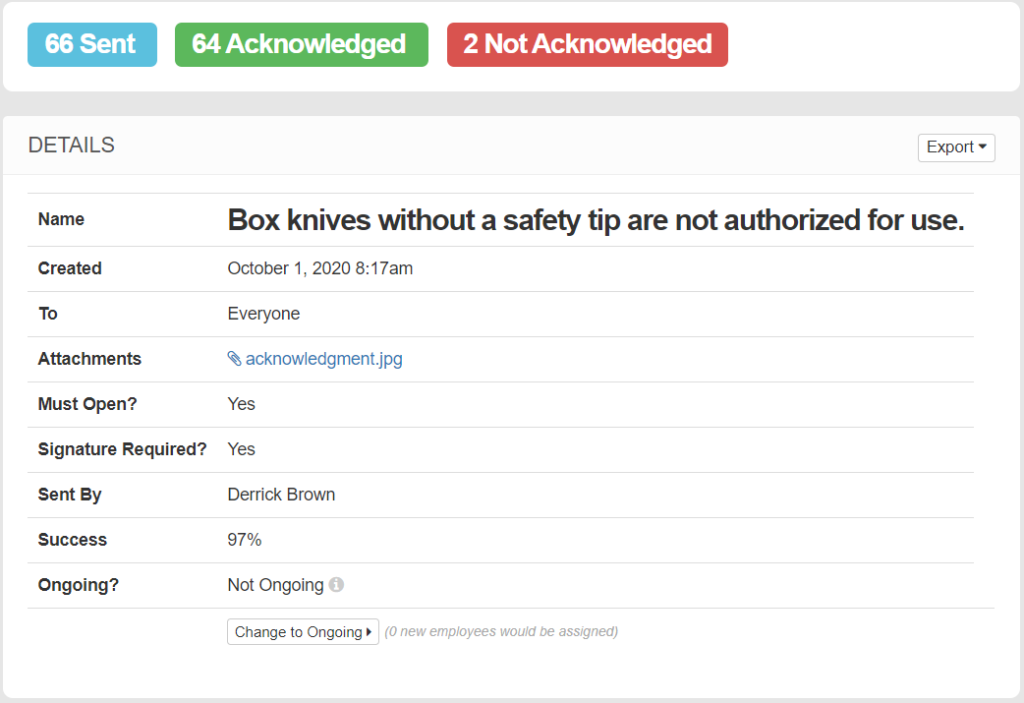
Once you have sent the acknowledgment, click Details to view its status. This page shows what was sent, and how many people have acknowledged the alert. It also includes a listing of each employee, a timestamp of when they acknowledged the notification, and their signature (if it was required).  

This data can be exported to a PDF document or an Excel spreadsheet by clicking the Export button in the top, right corner.

A screenshot of a computer

Description automatically generated

REVIEWING PENDING ACKNOWLEDGMENTS

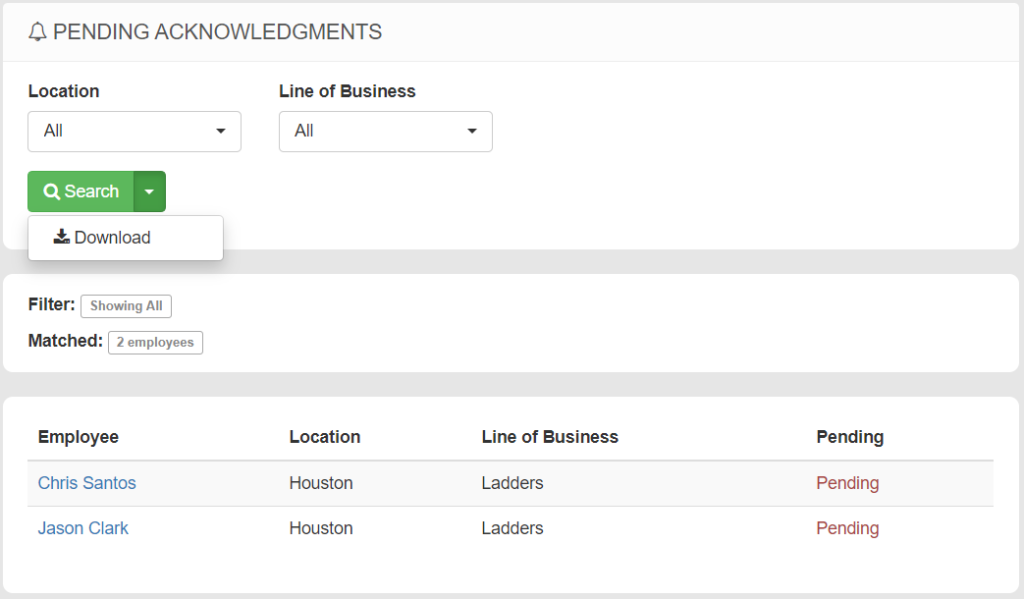
You can also review a Pending Acknowledgments Report, which lists any employees who have incomplete acknowledgments.

  • Navigate to Control Panel > Acknowledgments > Pending Report
  • You can filter by Location and/or Line of Business
  • Click Search
  • Click the white arrow next to the Search box to export the list to an Excel spreadsheet
A screenshot of a social media post

Description automatically generated